Sunday, December 30, 2012

MAPLE CRANBERRY SPREAD AND A CHARMING NEW YEAR!

So tomorrow happens to be my one year blogiversary for Silo Hill Farm and I wanted to share two things with you.  A recipe (which I rarely do) and something from my first post ever. 

Lets start with the recipe because I know so many of you made a New Years resolution that is diet related and this recipe can be made very low fat if you would like and I promise you it will still taste delicious!  It's a Maple Cranberry Spread....check it out.


Looks seriously good doesn't it!  It is so good on an English muffin, a waffle (my favorite), a bagel, toast, etc.  Heck, I like it as a spread on a turkey sandwich too!  It also looks beautiful on any brunch table. But, enough talk, lets get right to it.  You only need 4 simple ingredients and a few minutes to make this.


1 8oz. pkg. Cream Cheese, softened 
1/2 C. Dried Cranberries
1/3 C. Maple Syrup
1/4 C. Chopped, Toasted Pecans

In a small mixing bowl, combine all of the ingredients with an electric mixer.  Cover and refrigerate several hours.
 Makes 1-1/2 Cups

Wasn't that easy?  And so good too!  Trust me! (Especially the part about being good on a toasted waffle.)
Now...the other thing.....
This was part of my first blog post a year ago tomorrow.  It's good, timeless information, so I'm sharing it again for this coming year.  It was a little piece of paper that fell out of a magazine my neighbor gave me. 


 Have a Happy and a Charming New Year!! 

Come see me any time!

Linkin up to any or all of the fine parties listed HERE.    

Sunday, December 23, 2012

Resolve to Stick to your Resolutions this New Year

Hi everybody, it's Heather here from The Beating Hearth and I am going to talk about something we're all going to have on our minds in about...oh, I don't know, depending which hemisphere you hail from, 8 or so days.

New Year's Resolutions. 

To some, that's a dirty word.  Many people resolve not to make resolutions.  But, I like them.  I like the idea of being able to make myself a better person starting....NOW!

So, here's some of my resolutions...and some tips on how to make them a little easier to stick with.

LOSE WEIGHT


Yeah....the dreaded one.  But one that is so important!  Okay, so here it is.  I have lost 60 or so lbs, back in the day, and I maintained it until I had baby #2.  So, this is one of my resolutions this year because I need to lose...60 lbs again.  I am back where I started.  Ugghhh!!!  What have I learned about losing weight?

1.  It's okay to feel hungry.  We are so obsessed about not feeling hunger pains that we medicate ourselves with food to avoid the sensation.  I have to tell myself, if it's 4 pm and the dreaded munchies are upon me, that dinner is only a few hours away.  I just need to simmer down and realize I will be eating soon.  Feeling hungry is not the end of the world.  My favorite trick to take my mind off of wanting chocolate is to drink a cup of tea.  I don't sweeten it, so I'm not getting any calories, but the simple act of making the tea and then taking the time to drink it, helps me to forget the need to nibble.

2.  Cut out the sugar.  Also the salt and fat...but for this post I am talking about sugar.  I have gone off sugar....once.  For about a month.  It was one of the hardest things I've ever done.  But, I felt so good.  It was so painful for the first week, I was mean and nasty and just wanted a dang jaw breaker or anything to make me feel better.  But, I stuck with it.  After 2 weeks...I felt like I had a handle on the cravings.  I lost some weight and I felt really good!  Of course, the holiday season came along and I caved, but I really do feel sugar is the enemy.

Okay.  So that's the big one.  Now, here are a couple more that are more fun and have the goal of just making us better people.

MAKE YOUR BED EVERY DAY


This one is so easy..and yet I don't do it every day.  But when I don't...I notice there is something off when I go in my bedroom.  I know what it is...I just need to make my bed and tidy things up.  Once I do that I am so much happier!

COOK MORE FOR YOUR FAMILY


This isn't one I struggle with too much as I love to cook and my family eats in the home far more than we eat out.  But this year I am going to resolve to make more home-made bread for my kids and work to incorporate more vegetarian main courses.  The Mister is going to love that.  Come on lentil section of the grocery store!!!

EXERCISE


This one is so hard and yet essential.  I feel so much better when I have taken the time to exercise in the morning.  But...I want to sleep in that extra few minutes...so I don't do it.  Then I get working and no longer have time.  Not this year.  I resolve to wake up at least 30 minutes early to get a jog/walk in.  I have seriously not had a full night's sleep for about 4 1/2 years due to My Youngest being a terrible sleeper!  But, she has finally figured it out...mostly.  And I have been enjoying more sleep in the last month or so than ever.  So, I am going to turn this good fortune into waking earlier to accomplish this resolution.  There's been a new study out that if you sleep poorly it can lead to weight gain.  I am totally going with this for why I've not been able to shed the lbs.  No longer!  I am sleeping so therefore I am going to exercise!

ENJOY LIFE


It's time to enjoy life to the fullest!  Whether this means taking the time to read a book every night while lounging in a bubble bath or tickling your kids in the morning before school.  Maybe it's just taking the time to watch the sunset in the evening or a funny movie with somebody you love.  Take a vacation...even if it's just 30 minutes away.  Whatever it is, let's take the time to enjoy life.  Let's laugh more.  Let's have more fun.  We've got this one shot at a wonderful life so let's make the most of it.

Thanks for reading everybody and hope you have a wonderful New Year!


Heather

Friday, December 21, 2012

Simple Gift Wrap Idea - Marci at Stone Cottage Adventures

Inspiration Cafe is pleased to welcome back Marci from Stone Cottage Adventures with a unique and great looking gift wrap idea...just in time for the holidays too!


Would you like a simple, easy-to-open, gift wrap idea? 

EarlyDecember007

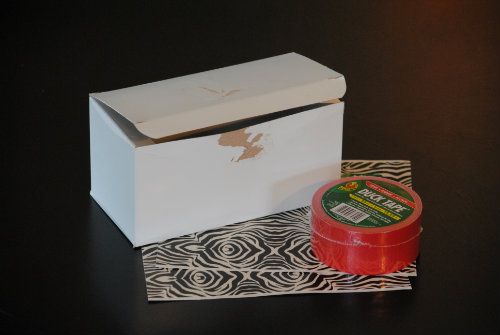
This box was still sturdy, but, well, OK, it looks kind of scruffy. 

EarlyDecember001

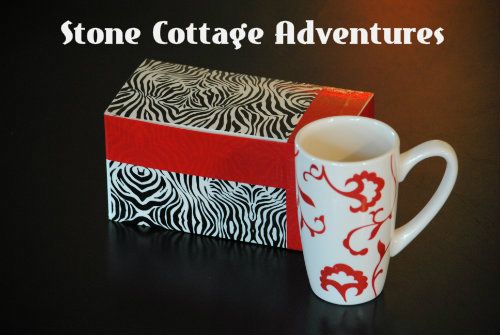
Using two sheets of zebra duct tape and just a little red... 

Goodbye, Scruffy!  Hello, Snazzy!   

EarlyDecember002

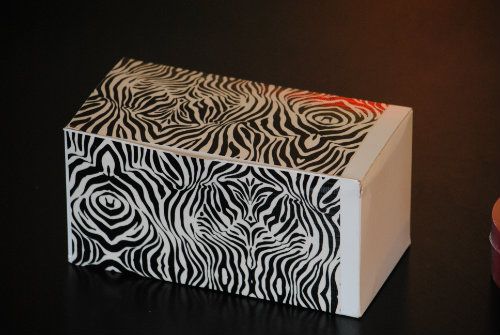
Sticking square duct tape on a square box is pretty simple.  I did not worry about the ends.

EarlyDecember004

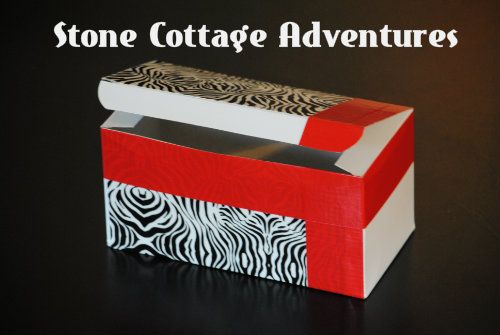
One corner of the box has a ding, AND the zebra wasn't quite big enough for the whole top.  It needs a little color anyway.  So, I added a zip of red!

EarlyDecember006

Here's my gift!  It hopped right into the box with some red tissue paper and a couple of candy canes!  Hello, Snazzy!

EarlyDecember007


Happy Wrapping!  ;-)  -Marci
Stone Cottage Adventures

Tuesday, December 18, 2012

Mellywood's Mansion - Christmas Boot Centrepiece


 Merry Christmas!

Hi I'm Mel, usually found over at Mellywood's Mansion, I was asked to work a shift here at the Inspiration Cafe for the Christmas rush.


Today I'm sharing my Christmas Boot Centrepiece, one of my Trash Chic items if you want to know what Trash Chic is you can read about it here

Supplies
A pair of kids outgrown Gunboots
Modpodge
Painters tape
Black Paint
Red Glitter
Faux Fur
HotGlue/Gun

Firstly and the most important step, if you plan on putting these on your table or using them to serve food, bleach and disinfect the shoes. There is nothing quite as classy as having your guests smell rotten kid feet at the table. Dry and give them a coat of ModPodge.

Once they're dry tape off the bottom of the boots and paint them black


Then tape off the black paint and coat with Modpodge and glitter the rest of the boot


Once that is dry cut your faux fur to size and hot glue around the top of the boot


Be warned if you think glitter gets everywhere, faux fur is an absolute nightmare! However it does look fantastic.

One the glue was dry I grabbed a small glass, and put it inside the boot and fill as desired. I think artificial flowers or flatware could also look amazing. However my 2 year old was fascinated with these so I went for the more kid friendly candy canes.


This was such a simple project and so much fun, if you would like to check out a few more of my Christmas things like my                                    


Come on over we love guests at the Mansion or find me on Facebook


Thanks to all the lovely ladies behind the Inspiration Cafe for having me back and to everyone, may you have a Wonderful Christmas and a  Happy New Year.


Mel xo

Sunday, December 16, 2012

Four Easy Go-To Holiday Treats That Are Sure To Be Crowd Pleasers!


Seasons Greetings!

It's Mary, from 
Sweet Little Bluebird!


Today I am sharing FOUR recipes that are favorites 
of my family and friends! They are ridiculously 
easy to make with just a few ingredients...
and oh so good! 

First recipe, 

ROLO TURTLES


My friend made these for a holiday cookie swap a few years back, 
it was my first time ever having them.  They are so darn good!  
                                                                                                                               
ROLO TURTLE RECIPE:
Ingredients
Bag of Pretzels Squares or Rounds (Reg or Butter Flavor)
Bag of Rolos- approx 56 rolos  in  12 oz. bag
Bag of Pecan Halves

Directions
Preheat oven to 250*F
Line the pretzels on cookie sheet, place a Rolo on top of each pretzel.  Bake 4-5 mins, just long enough for the Rolo to get soft, DO NOT OVER BAKE.  Pull from oven, take a pecan half and lightly press down on top of rolo.  Cool.  Eat.  Yum.

*If you have a nut allergy in the house, instead of using a pecan, just place another pretzel on top.  They also can be made in the microwave!


                 ......................................................................................

Next recipe,
shared by a sweet friend...

PRINCESS COOKIES, 
my little one's favorite!

You won't believe how good these are!
Trust me, they will fly off the plate!


PRINCESS COOKIES RECIPE 

Printable Recipe 


Ingredients

1 box of Wheat Thins

Creamy peanut butter

White or milk chocolate

Sprinkles

Direction
Make peanut butter sandwiches with the Wheat Thins, *see photo above.
Dip in white or milk chocolate, place on wax paper,
add some sprinkles...you're done.  So darn yummy!

...................................................................................

Next Recipe,

BUCKEYES!

If you love Reese's Peanut Butter Cups, you will love this simple recipe!
This recipe has been around for decades...since I was a kid.  
Only 4 ingredients!

BUCKEYE RECIPE:

Ingredients
1 Cup Creamy Peanut Butter
2 Cups Powdered Sugar
1/2 Cup Butter (salted or unsalted) Softened
2 Cups of Semi-Sweet Chocolate Chips

Directions
In a large bowl,  mix peanut butter, butter and powdered sugar. Cream together 
until blended well.  Next, roll peanut butter mixture into 1 inch balls and place 
on a cookie sheet covered with wax paper.  Place balls in freezer for 30 to 40 
minutes until firm.  When the balls are firm, melt chocolate chips in a microwave 
safe bowl, approximately 1 1/2 to 2 minutes, checking often and stirring.  Insert a toothpick in center of a ball and dip it 3/4 in the melted chocolate.  Place back on wax paper to set.  They set faster in the fridge or freezer.  Recipe makes approximately 25-30 buckeyes!  I store my buckeyes in the fridge.  Enjoy!

.........................................................................................

And finally,

EASY PEANUT BUTTER CUP COOKIES

The easiest Peanut Butter Cookies you will ever bake!


EASY PEANUT BUTTER CUP COOKIES RECIPE:

Ingredients
1 cup creamy peanut butter
1 cup sugar
1 egg

Optional 
Mini Reese's Peanut Butter Cups
1/2 cup mini semi-sweet chocolate chips

Directions
Preheat oven to 350 degrees F.  
Cream peanut butter, sugar and egg together.  If you want mini chocolate chips, add them after you cream the first three ingredients.  Take a spoonful of dough, form into a ball, place a peanut butter cup in the middle, cover PB cup completely.  Place on cookie sheet.  Bake for 8-10 mins on middle rack of oven.  *Do not over bake.  Remove, allow to cool.  Enjoy!

I've seen the recipe several times over the years.  One was just for peanut butter cookies, another was for Reese's Peanut Butter Cup cookies.  If you want just a simple peanut butter cookie, skip the peanut butter cups and chocolate chips.  If you prefer chocolate chip peanut butter cookies, skip the Reese's Peanut Butter Cups.   Have fun with this easy recipe! Our house likes the peanut butter cups and mini chocolate chips!  Yum!

.............................................................................


Thank you so much for stopping by Inspiration Cafe!  
I won't be near a computer most of the week, 
but hope to be back by the weekend.  If you have any 
questions about the recipes, leave them in the comment 
section and I will reply as soon as I can.   

Happy Holidays!

Mary


Wednesday, December 12, 2012

Scrapbook Paper Ornament Picture from Polka Dots and Paisley


I'm Al from Polka Dots and Paisley and I’m so thrilled to be here with you at Inspiration CafĂ© today. I’ve been a regular reader and I love the eclectic mix of ideas that are shared by the many people on this site.


I’m in the midst of a crazy year that has involved getting married, having my 11 and 13 year old stepkids move in full time, and switching from a traditional junior high to a grades 7 – 12 outreach school. While free time is hard to come by, I make sure to have time for crafting. It’s my way to unwind and de-stress. But that's enough about me; let’s get on to the project. 

Please excuse the shadows. It's dark when I go to school and dark when I
get home so it's difficult to get nice photos with natural light.

To start, I cut a piece of card stock (I love the burlap look) to fit in an 8x10 frame. Next I cut 3 circles out of Christmas paper, making one slightly smaller than the others. To make the circles look like hanging ornaments I poked a hole in each of them with a pen and threaded them with bakers twine. After that I inked the edges with brown ink and then stuck the ornaments in place. The middle one is stuck on using raised dots, which adds a bit of dimension to the picture even after it’s framed, while the other two are attached using glue. Once everything on the front was attached, I turned the paper over and taped down the ends of the twine to the back.


Don't you love the snowman bowl?
I keep my school keys and chap stick in it to avoid filling it with candy.

Seriously, that’s it. As I write this, I’m a little embarrassed by how uncomplicated it is. Oh well. Quick, cheap and easy – my kind of craft! I’m not one for clutter or busy stuff so I love the simplicity of this piece but you could easily fancy it up with glitter, ribbons, buttons, or whatever you have on hand. If you’d like to see more of my projects, feel free to stop on over to Polka Dots and Paisley and say hi. I'd love to have you!


Sunday, December 9, 2012

Sweet Snowman Pendant Necklace

 
Hey Everyone,

Here in New Zealand we have a Summer Christmas, so..... no snow!
But our warm Kiwi Christmas' are pretty awesome too...

One year, Sean and I were in England and we got to experience a white Christmas...and I even got to build my very own snowman.

So, today I have a cute, easy and fun holiday inspired pendant tutorial for you. 

  What you need:

2 large beads, seed beads, 1 headpin, a length of jewelry wire, a chain and pliers.

Following the steps laid out in the pictures, so easy!

Thread the 2 large beads onto the headpin,
Bend back to 90 degrees, loop back around with the pliers
and wrap the end of the headpin around and secure it with a gentle squeeze with the pliers.
Thread the seed beads onto the jewelry wire and secure the ends, I just looped the wire back into the last bead on each end.
Mould the scarf around your finger then wrap it around the snowman's neck and press into place.

Add a chain...
 
And there you have a really cute little snowman necklace...

These would make awesome hand made gifts or even Christmas ornaments for a little tree.


I really hope you are inspired to give this tutorial a go.... 

Are you giving handmade gifts this year?

If so, we would love to hear your ideas and what you're making.
 

Don't forget to follow us on Facebook,


Take care and have a great week

 xxx
 

Photobucket
and: