


Friday, February 22, 2013

Felt Bunting Pillow Cover Tutorial - Clippie Dips

Hey Everyone, Amy from Clippie Dips is here again to share an awesome pillow tutorial with us...
 

What you need:


  • a half yard of felt
  • felt scraps
  • sewing machine, heavy duty needle preferred
  • thread
  • 16" x 16" pillow form
  • scissors or rotary cutter
  • pins
Gather your supplies and let's get started!

Out of the half yard of felt, cut:


  • (1) 17" x 17" piece for cover front
  • (1) 17" x 10 1/2" piece for the back
  • (1) 17" x 9" piece also for the back

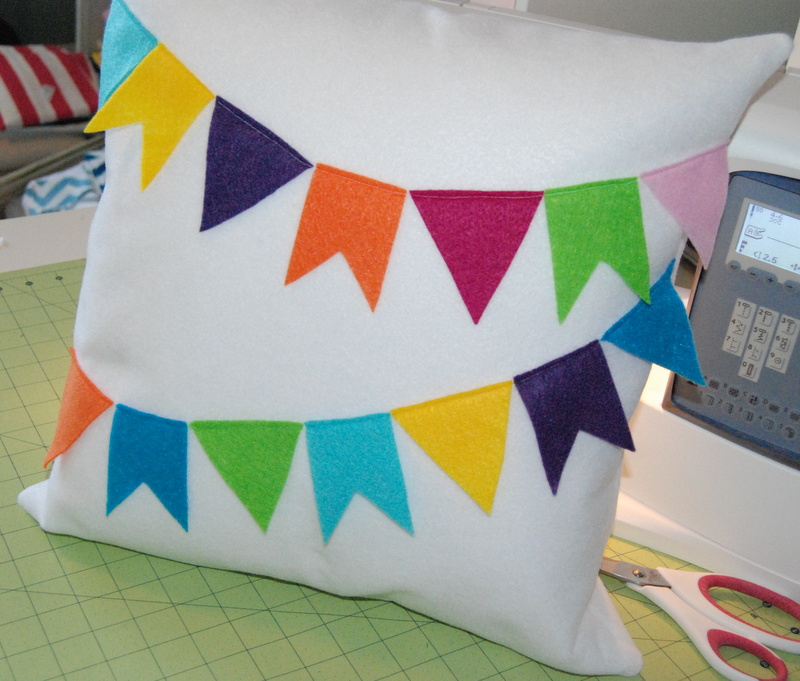
Out of your felt scraps, cut out bunting shaped triangles-mix and match the colors until you have enough. You can either freehand the triangles like I did or make yourself a template out of cardstock so each triangle is the same size. Of course, you don't necessarily have to use triangles. Here are some of the most common bunting shapes.
Once you have your pieces, lay them out on the pillow cover front. You can arrange them any way you like. Make sure your bunting pieces are far enough away from the edge so as to not get caught in the seam allowance. When you're satisfied, pin each one in place.

 Then take your pillow cover front piece to your machine and sew the bunting in place with a 1/4" seam allowance.
The front is done. Set that aside for now.
Now grab one of the pieces that you cut for the back side of your pillow cover and fold the long side over 1/2" and pin. Keep folding and pinning all the way down the long side. Do the same with the other back piece.

Once they're both pinned, you're going to sew all the way down the long side, very close the edge, taking the pins out as you go. Do this for both pieces.


Set your back pieces aside and let's take a look at your front piece again. On mine, I had 3 bunting pieces that were in danger of being sewn into the seam...we don't want that! Fold them in and pin them out of the way like shown below.


Now we're going to sew the pillow cover together. Place the front cover right side up. Then place one of the back pieces right side down on top of the cover front. (Doesn't matter which one!) Match up the 2 long sides.
Felt tends to get a bit distorted when you work with it, so the top and bottom may not line up perfectly. That's ok, I promise! If you want, you can trim the overhang.
Take the other back piece and place it on the other side, right side down. These pieces will overlap.

Pin all around. If you look at mine, you will notice my pins are very close together. That's because felt likes to shift as you sew. If you've sewn fleece, you know what I'm talking about!


Next, sew all the way around the outside of the cover, using a scant 1/4" seam allowance and backstitching at the beginning and end. Remove pins as you sew.

 Once you're done, clip the corners but be careful not to cut through the thread!
Turn the cover back out so that it's the right way and remove the pins used to hold the bunting out of the way.

Slide the pillow form into the cover through the opening in the back. It may take a little bit of wiggling to get it centered as there will be a bit of extra room around the sides of the pillow.
Guess what?! You're done and now you have a pretty little felt bunting pillow! Enjoy!


Thursday, February 21, 2013

Rosemary Infused Oil - Grace Grits and Gardening


We have so much rosemary growing in our garden, I am forever trying to work it into cooking, cleaning and decorating. 

This rosemary infused olive oil is very flavorful, can be used in a variety of recipes and makes a great gift. 

Ingredients
1 cup olive oil
5-6 sprigs rosemary

Heat olive oil and rosemary on the stovetop on medium heat for five minutes. Return to room temperature.

Place a few of the rosemary twigs inside a decorative container and fill with olive oil. This will store in the refrigerator for a month.


Rosemary Snacks...

Popcorn: For an unusual twist on an old standby, drizzle a tablespoon of rosemary infused olive oil over air-popped popcorn. Sprinkle with finely chopped rosemary and sea salt. Yum!

Almonds: Spread 2-3 cups raw almonds on a cookie sheet. Drizzle rosemary infused olive oil over and mix to lightly coat. Sprinkle with sea salt, cayenne, chopped rosemary to taste. Bake at 350 for 10-12 minutes, stirring occasionally. Delicious!


Enjoy!

Grace Grits and Gardening

Talya

Wednesday, February 20, 2013

Last Minute Leg Warmers - Controlling Craziness

Hi there, I'm Christa, stay at home mom to three cute and crazy kids.  I love to blog about organization, home decor, making my life easier and of course my crazy kid adventures.  You can find me over at CONTROLLING Craziness.  I'd love it if you stopped by and followed along.


I'm excited to be doing my first ever guest post!  Thanks so much to Danni and the entire Inspiration Cafe team for this opportunity.  

I'm going to share with you how I made leg warmers for my daughter.  It was super easy and they turned out really cute on her  (I'm hoping she lets me wear them too).  


The other day, 10 minutes before my oldest daughter had to leave home for the bus stop, she tells me there's something wrong with her outfit.  This is the outfit she picked out the night before and really wanted to wear.  By the way, she dressed her American Girl doll in the same outfit so changing was out of the question.

This particular outfit was a bit spring like (short sleeves and capri leggings) but we thought we could pair it with a sweater and boots to make it work for winter.  We live in PA, so it's still cold around here.

There was one problem.  The leggings weren't long enough and you could see their lacy ends and her bare legs just above the top of her boots.  


Never fear, Mom to the rescue!  I had seen on Pinterest where people had cut off the sleeves of a sweater and used it as a boot liner.  Luckily I had this brown sweater that I didn't really like the way it fit, so I was more than willing to cut off the sleeves.  I made sure to cut off a lot of the sleeve to make the boot liner long enough for me to use too.  Can't have my daughter being the only fashionable one in the family now can I?


I didn't finish off the ends or anything since there wasn't time.  And let's face it, I probably won't finish them off unless they start to unravel.


She loves them and they make her capri leggings (or any too short leggings) great to pair with boots.


Thanks again for allowing me this opportunity.  Don't forget to stop by CONTROLLING Craziness and check out what else I've been up to.

Thanks,
Christa

Tuesday, February 19, 2013

Furniture Makeover Series #2 - Simply Vintageous...by Suzan

Hi everyone!!! Simply Vintageous...by Suzan at your service again this week LOL SHE'S BACKKKKKKKKKK!!! Just when you thought it was safe to visit the Inspiration Cafe! Here I am with my second installment - and there's going to be a third one before you get rid of me LMHO!!! This is a long post - beware! A few weeks ago I received an email out of the blue from someone I had bought a piece of furniture from over a year ago - she had a table that she thought I might be interested in.


A little antique drop leaf table? Yes please! Can you remember when those flowers were the " rage " ? not sure what they were painted with but they were really difficult to sand off - and they HAD to be sanded off because they were raised - it was sort of like glue - came off in clumps and little balls all over the place but I finally got them sanded down and began the process of reinventing this little cutie pie. I decided I wanted to do a Herringbone pattern on this and here's how I did it Not sure how great a tutorial this is because I tend to not measure - I kind of eyeball things - sometimes it doesn't work out lol - but most of the time it does............. here we go I first gave it a couple of coats of pink paint - sorry the photo below is after only 1 coat and you can clearly see that it needs another one at this point................. The legs had already been painted white - so just needed one coat on them.  Already it's looking so clean and pretty.


Next I prepped the surface to make a herringbone pattern ( or you can call it Chevron - or you can call it Zig Zag ( remember that skit? well you can call me Ray or you can call me ............... ) First by putting 3 strips of painters tape down the length of the table - again - only eyeballing it!  You may choose to do the wise thing and measure - I kind of like things better when they're not " factory " looking perfect ( plus I'm just a little bit lazy - and far too impatient )


then I started on the angled stripes - the only thing that's important here is that you get the zig zags to " meet " at the peaks..............this is really as easy as it gets.


Once I finished that, I then went back and did another row in between each zig zag


Not necessary - it just depends how far apart you want your pattern to be. I then painted in between the tape with Annie Sloan Pure White.


You can make yourself a cup of tea at this point - NOT WINE - wine and zig zags are dangerous together


Is that a bubble in my tea? My mother swears that means money is coming your way................ A typical conversation with my Mother would go like this Mumsy says - Oh Susie - you're going to get money!!! Susie says  - Mom - you always say that - it's just bubbles in my tea Mumsy says  - well last week I had bubbles in my tea - and guess what - my pension cheque came in the next day  ( this is a TRUE conversation ) Susie says - But it ALWAYS comes in on the first of the month Mumsy says - well I'm just saying - it always happens - that's all Susie says - What are you going to do if you don't get bubbles in your tea next month - will your pension cheque not come? Mumsy says - Don't be ridiculous Susie says - I try not to be Mom, I try not to be........................... Ok you're not here for that lol This is how it looks with all the white finished on the top
.

I remove the tape as soon as I'm done - I never wait for the paint to dry because often it will remove some of the base color ( in this case the pink ) if it's been on too long - painters tape should always be removed when your paint is still tacky Should I mail this to you Danni - you could probably make something awesome with it for St Paddy's day!!!


and here's the result


I then decided I should have done the drop leafs too ( originally I was going to stencil something on them ) And here it is all done! I'm going to advertise this as multi functional So first up here it is as a changing table


Baskets or bins - or even a toy box can be stored underneath You can lift up the back drop leaf to keep things handy


and then when a changing table is no longer needed it can become a craft table / desk by lifting out the front drop leaf


opening up both leaves makes it a perfect " games " table as princess grows...........


and then when play time is finished - it quickly can go back to being a bedside table........... all folded up and out of the way


what a difference a little paint makes, right?


I'm thinking this one may sell - because there were bubbles in my TEA after all - and if not, well there goes Mumsy's theory all shot to hell! Thanks again Ladies for having me!!! It really is an honor............. See you all next week

Sunday, February 17, 2013

Upcycled Dresser to TV Cabinet


Its been a while since I had a piece of furniture to repurpose. 

I've missed the sanding, painting and distressing...its therapeutic to me. 

I love that my hubby can get involved too, he rolls his eyes at my ideas sometimes and yet he is always surprised at how well it turns out! 
After all these years he really shouldn't doubt me!!!

The TV stand in our living room has always been either this monstrous dark chest or an awful black cabinet (which has long been moved to the sidewalk)
I love that old dark chest, my Mom gave it to me for my 16th birthday. I have plans to paint it one day, but I'm still thinking about it though. 

It just wasn't working in the corner of the room, it was too dark, heavy and in the way. Has been for the last five years.

A couple of years back I bought an ugly laminated chest of drawers from the thrift store for the kids to use. Ugly...

Then after living with all this darkness and ugliness for long enough I enlisted Sean's help to convert the chest of drawers into a TV cabinet. Easy right?

We ripped the back off, removed and reused the wood from the drawers to build a new base and shelf.
Then a couple of coats of white paint, distressing and sealing, the cabinet was good to go! 

This was a pretty easy weekend project.

I bought the wicker baskets on clearance at Briscoes. The kids to store their mega blocks in them and I'm a happier mum with a neater living room.

 The whole corner of the room has opened right up and it looks so spacious, modern and clean.

I'm seriously loving all the extra natural light too.


This Instagram photo was taken on a very humid day a little while ago and while I took it of Maclayne just laying around trying to cool down, the cabinet looks really great and the room so fresh. 

As you can see Sean has already upgraded his speaker system!


Now I'm looking for my next big project!

Take care and have a great week, don't forget to follow us on Facebook,


 xxx
 
Photobucket


Inspiration Cafe is looking for guest posters. If you would like to guest please let us know, we would love to have you. If you would prefer a feature instead, feel free to drop us a line. New or old posts welcome.

Sharing with these great parties
and these

http://www.alderberryhill.com/make-the-scene-monday-62/
http://thededicatedhouse.blogspot.co.nz/2013/02/make-it-pretty-monday-week-37.html 
http://linda-coastalcharm.blogspot.com/
http://www.blackberryvine.blogspot.co.nz/2013/02/tuesday-to-do-party-100-99-list-makers.html
http://threemangoseeds.blogspot.com/2013/02/its-party-time-21213.html  
http://www.craftytexasgirls.com/2013/02/vintage-homedecor-ideas.html#more
http://diybydesign.blogspot.co.nz/2013/02/winter-blues-wednesday-its-party-105.html  
http://www.homestoriesatoz.com/tutorials/tutorials-tips-link-party-97.html
http://www.savvysouthernstyle.net/2013/02/wow-us-wednesdays-106.html
http://igottacreate.blogspot.co.nz/2013/02/wildly-original-link-party-40.html#more 
http://staceyembracingchange.blogspot.co.nz/2013/02/creative-inspirations-linky-party_20.html 
http://www.momontimeout.com/2013/02/your-creative-timeout-party-no-70/
http://www.saving4six.com/2013/02/welcome-to-think-tank-thursday-18.html
http://www.theshabbycreekcottage.com/2013/02/transformation-thursday-no-192.html 
http://www.houseofhepworths.com/2013/02/20/hookin-up-with-hoh-136/ 
http://www.stonegableblog.com/2013/02/tutorials-tips-and-tidbits-36.html 
http://bloomdesignsonline.blogspot.co.nz/2013/02/link-party_20.html
http://www.sweetbellaroos.com/2013/02/21/pin-it-thursday-23/
 http://www.the36thavenue.com/2013/02/best-recipes-and-party-time.html
http://chiconashoestringdecorating.blogspot.co.nz/2013/02/flaunt-it-friday-141.html
http://frenchcountrycottage.blogspot.co.nz/2013/02/feathered-nest-friday_21.html
http://thecharmofhome.blogspot.co.nz/2013/02/home-sweet-home-107.html
http://shabbynest.blogspot.co.nz/2013/02/frugal-friday_3922.html#more
http://tatertotsandjello.com/2013/02/weekend-wrap-up-party-and-initials-inc-giveaway.html
http://www.craftberrybush.com/2013/02/the-inspiration-gallery-week-24.html
http://www.funkyjunkinteriors.net/2013/02/sns-176-junk-garden-planters.html
http://appleofmamaseye.blogspot.co.nz/2013/02/thrifty-thursday-easy-peasy-pepperoni.html