Showing posts with label tutorial. Show all posts

Sunday, June 23, 2013

Bloomin Marvelous Series - Summer Garden

Hey Everyone, 

Today, I am so excited to be kicking off our next series called Bloomin Marvelous and it's all about Gardens - anything to do with gardens! 

So I'm going to be sharing an easy Statement Necklace tutorial based on a strip of ceramic flower shaped beads that just reminded me of a Summer garden.

What you need for a necklace:

1 headpin, jump rings, chain, a clasp, beads and a focal bead.
Pliers (not pictured) 

What to do:

1. Thread focal bead and other beads onto the headpin
2.  Bend the headpin at a 90 degree angle.
3.  Using round nosed jewelry pliers, bend the headpin back around to form a half loop.
4. Measure the middle of your length of chain and hook the headpin through a link in the chain 
5. Twist the wire of the headpin around the loop.
6. Keep twisting around the loop, pulling the wire neatly in a circle. tuck and tighten the end.
7. Thread seed beads on to jump rings.
8. Work your way along the chain, on either side of the focal, adding the seed beads.
9. Complete the necklace by adding the clasp.


Easy right? So easy!

 It turned out much better than I pictured! Don't you think?


Because I was loving the colour combination so much I whipped up a simple bracelet to match.


I just loved this challenge! I had so much fun making these items.


And they just shout Summer Garden.


I hope you were inspired today and I hope you all enjoyed my tutorial.

Don't forget to stop by next week for our next post in the series.


Take care everyone
 
 xxx
 
Photobucket

Linking Up to These Great Parties

http://www.uncommondesignsonline.com/coastal-decor-monday-funday-link-party-23/
http://www.everythingetsy.com/2013/06/crafty-girl-linky-party-crafty-tote-bag-giveaway 
http://www.sewcando.com/2013/06/craftastic-link-party-time-sprightly.html 

5 Patriotic Crafts | Making the World Cuter Monday #180
 http://withablast.blogspot.co.nz/2013/06/all-my-bloggy-friends-link-party-52.html
 http://www.craftytexasgirls.com/2013/06/the-scoop-link-party-72-with-crafty.html#more
http://www.watchoutmartha.net/2013/06/martha-mondays-link-up-party-features_23.html
 http://www.homestoriesatoz.com/tutorials/tutorials-tips-link-party-115.html
 http://cupcakesandcrinoline.com/2013/06/project-inspired-linky-party-19/
http://www.blackberryvine.blogspot.co.nz/2013/06/tuesday-to-do-118-and-117-list-makers.html 
http://www.craftyconfessions.com/2013/06/tuesday-confessional-link-party_24.html
http://www.notjustahousewife.net/2013/06/show-me-what-ya-got-125.html
 http://www.mygirlishwhims.com/2013/06/your-whims-wednesday-117-and-features.html
http://www.gingersnapcrafts.com/2013/06/wow-me-wednesday-109.html
http://www.smartschoolhouse.com/2013/06/link-party-whimsy-wednesday-june-25th.html
http://www.savvysouthernstyle.net/2013/06/wow-us-wednesdays-124.html
http://www.the36thavenue.com/2013/06/best-diy-projects-17.html
http://www.52mantels.com/2013/06/thursdays-are-your-days-terrariums.html
http://www.theshabbycreekcottage.com/2013/06/transformation-thursday-no-210.html
http://www.houseofhepworths.com/2013/06/26/hookin-up-with-hoh-154/
http://www.stonegableblog.com/2013/06/tutorials-tips-and-tidbits-54.html
http://igottacreate.blogspot.co.nz/2013/06/wildly-original-link-party-58.html
http://happyhourprojects.com/happy-hour-friday-06-28/
http://www.oneartsymama.com/2013/06/shine-on-fridays.html

Wednesday, March 20, 2013

Feral Turtle - Soap Making

I was so excited to be asked to guest post here on the Inspiration Cafe.
Thanks Mel from Mellywood's Mansion for the invite!

Hi There!  I'm the FERAL TURTLE.
 I have been blogging for just over a year now!  I am a Canadian girl, a rural dweller, who loves to garden, reno my hundred and eight year old home, and craft.
This is how I make soap! 

People stink!  A quick remedy for this, a shower with soap!  Voila...no more stinky people!  If you happen to have stinky people with sensitive skin, you could make them a bar of Castile soap, which is a pure olive oil soap, free from sodium lauryl sulphate; a.k.a. SLS
   This soap is a gentle and mild cleanser.  People who have eczema  as well as  sensitivity to (SLS), prefer this soap.
SOAP MAKING CAN BE A DANGEROUS HOBBY.  PLEASE DO YOUR RESEARCH CAREFULLY BEFORE ATTEMPTING.  

  I must stress that soap making can cause serious burns and that proper equipment is a must.  My soap kit contains heavy rubber gloves, safety glasses, a thick apron and long sleeves.  For equipment, I use a large stainless steel pot, a glass quart wide mouth canning jar,  a wooden spoon,  small glass dish,  a scale,  a silicon spatula,  a hand held stick blender, a large stainless steel mixing bowl,  and a homemade soap mold.

I gather all my ingredients to start.
PUT ON YOUR SAFETY GLASSES,  RUBBER GLOVES,   LONG SLEEVES,   AND APRON!!!!
DO NOT START THESE NEXT STEPS WITHOUT SAFETY GEAR.

 Weigh 11 ounces of cold water into a quart sized wide mouth mason jar and place in a stainless steel bowl.  I put the bowl and jar in the  kitchen sink.  If any spills, it will clean your drains.
  SEPARATELY weigh out  4 ounces of sodium hydroxide into a small glass dish. 
 Pour the sodium hydroxide INTO the water, not the other way around.  Fill stainless steel bowl halfway with cold water as pictured below.  This will help cool the sodium hydroxide mix quickly. Stir this with a wooden skewer until dissolved.  Make sure you are wearing your protective gear.  This stuff is dangerous.  Don't breathe in the fumes cuz it will make you cough.  Let the solution cool to 110 degrees.


Meanwhile weigh and pour 32 ounces of  olive oil into a large stainless steel pot. (THIS IS ONE TIME YOU CAN CHEAP OUT .  JUST USE PLAIN OLIVE OIL.  YOU DON'T NEED TO BUY THE EXPENSIVE EXTRA VIRGIN OLIVE OIL.  VIRGIN OIL DOESN'T MAKE GOOD SOAP.)    Heat to 110 degrees. 


When both the sodium hydroxide solution and oil are at 110 degrees, pour the sodium hydroxide solution into the oil.   Stir this mixture for about 15 minutes with the wooden spoon.


Next step is to get out the stick mixer or you could be stirring for days.  Mix the soap until it reaches trace.  This means the mixture will change colors (a creamy off white) and will thicken.  It should be the consistency of vanilla pudding.  You can add your essential oil now (up to 2 ounces) and mix thoroughly with the stick mixer.  If I am making lavender soap, this is when I would add 1/4 cup of lavender seeds, stirring them in by hand.  You could add poppy seeds to lemon soap......etc. etc.


 Pour the mixture into the mold, scraping the pot out with a silicone spatula.  This mold was designed to hold this size batch of soap.  A mold can be made from a heavy cardboard box lined with plastic.  I would say a box about 10 inches long x 4 inches deep  x 3 inches wide.  You can build this from wood too.  This would be the better option if you are planning on making soap more than once.  Make sure you line your mold with plastic though, or your soap will get stuck when cured and could also leak out the sides when you pour it into the mold. 
 Your mold must be leak proof!


When the mold is full, cover exposed soap with plastic.  I use saran wrap.  Wrap in a blanket and let sit for at least 3 days to harden. 
When the soap is hard, remove from mold and cut into bars
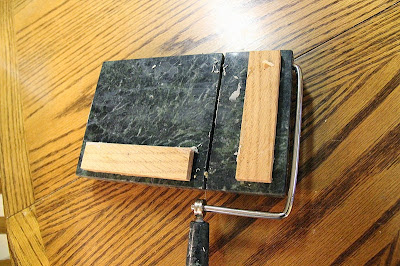
 I use a cheese cutter that I modified with some sticks and epoxy so I could cut the soap in even bars.  (I see cheese cutters at the second hand stores all the time.)
 You can use a large sharp knife to cut your soap too.  Whatever you have!


The soap needs to cure for minimum 4 weeks.  I leave mine longer, usually 6 to 8 weeks as Castile soap needs a longer curing time.  I put it in a closet with wire racks so that air can circulate around the bars.
After it has cured,  the soap is sealed in shrink wrap to keep the essential oils from evaporating.  You can wrap it in fabric and tie with a bow, or in cardboard with a flower hot glued to the packaging, or just leave it in the air.  You will still maintain scent in your bar, but sealing it, keeps the smell stronger.


 I cheated!  I am showing you a bar of lavender soap (see the lavender buds). 
The blog batch is still curing.
HAPPY LATHERING!
CHEERS!

Thanks to the amazing Inspiration Cafe for featuring my blog.  


Perhaps you would like to visit a few of my other posts:

The building of a bathroom

Building some wine storage

Wednesday, January 30, 2013

Wool Longies by Mammy Made

Adele is here from Mammy Made, today...


Hi everyone. I’m Adele and I live in England with my two gorgeous babies, Leyla who is 4 and Naomie who is 2. I am so excited to be contributing to Inspiration Cafe today!


I usually blog over at Mammy Made. I like to write about crafting, cooking and homeschooling, although I am only homeschooling part time at the minute. I have tons of tutorials on there so come by and say hi, I’d love to see you! 

Today I am going to be sharing a pattern I made for wool longies.


I love seeing little babies in wool longies, I think they look seriously cute. I've never been brave enough to use them as longies, they are always just used as wool pants for us over a pocket nappy or a fitted and a wrap but they do make waterproof longies if you lanolise them. I used to have a pair that I'd made from a pattern I found online, I can't remember which one it was now but it wasn't perfect for us. 


I decided to make my own pattern, making the gusset wider and the legs a little tighter, more like leggings. I also made the rise higher. Then I decided I wanted to change the seam from on the side to being centred at the back, just to make it look a bit neater. That took me aaages but it was worth it because now I have a pattern that fits my two kids perfectly! Here is my pattern that I came up with :)

This pattern is for a size small. This size will fit approximately 0-6months.

You will need:

  • 5mm crochet hook
  • 6mm crochet hook
  • 100% wool (if you want to lanolise them - make sure the wool is not machine washable! If you want to use them as wool pants that are not waterproof you can use cheaper acrylic DK yarn)
  • wool needle

Abbreviations:

  • ch - chain
  • sc - single crochet
  • st - stitch
  • slst - slip stitch
  • hdc - half double crochet
  • dc - double crochet
  • sc2tog - single crochet two stitches together

Waistband:

1. Using 5mm hook, ch5, sc in 2nd ch from hook and across (4sc), ch1, turn and sc in back loops only until you have 59 rows altogether including foundation row. Join the waistband into a ring with a slip stitch under 2 loops at the bottom of the first row, being careful not to twist the ring. This will leave a v shape at the top of the waistband which will need stitching up at the end.
2. Using 6mm hook, ch1, turn, sc in same st and next 2sts, 2sc in next st (I counted each row as a new stitch so the 2scs went into the row with only one loop not two, this makes the holes for the drawstring) *sc in 3sts, 2scs in next st* end with sc in last 2sts, join with slst in 1st sc (72)

Body:

3. Ch1, turn, sc around, join with slst in first sc (72)
4-9. Repeat row 3
10. Ch3, turn, dc in 10sts, hdc in 5sts, sc in 42sts, hdc in 5sts, dc in11sts, join in top of ch3 (74)
11. Ch1, turn, sc2tog, sc around till last 2sts, sc2tog, join with slst in first sc (72)
12-13. Ch1, turn, sc around, join with slst in first sc
14.  Repeat row 10
15-34. Repeat rows 11-14 5 times
35. Ch1, turn, sc2tog, sc around till last 2sts, sc2tog, join with slst in first sc, bind off

Gusset:

36. With back of st facing, count back 5sts, join yarn, ch1, sc in same st and in next 8sts - you want the previous rows bind off to be right in the centre of the gusset (9)
37-40. Ch1, turn, sc across
41. Bind off, leaving a long tail, stitch the gusset to the middle 10sts on the opposite side of pants, check to make sure both legs have an even number of stitches

Legs:

42. With back of st facing, join yarn in middle of gusset, ch1, sc in same st and all around, join with slst in 1st sc 
43-67. Ch1, turn, sc around, join with slst in first sc
68. Ch1, turn, *sc in 1st, sc2tog* rep till end, join with slst in first sc 
69-73. Ch1, turn, sc around, join with slst in first sc, bind off, weave in ends

Drawstring:

74. Chain enough to go twice round waist, slst in 2nd ch from hook and across, bind off, weave in ends.


Remember not to wash your 100% wool longies in the washing machine. They will need to be handwashed in lukewarm water and left to airdry flat to keep them in the best condition.

I hope you all enjoyed this tutorial. Thank you so much to everyone behind Inspiration Cafe for letting me contribute. It's been fun!