Showing posts with label Valentine's Decoration Craft. Show all posts

Tuesday, January 14, 2014

Vintage Valentine Mosaic - Junkin' Jewels Series

With Valentines Day just a month away, we are so pleased to have Carlene from Organized Clutter create a seriously awesome Valentine project and give us an easy to follow tutorial.  

Hi!  I'm Carlene, and I collect, up-cycle, re-purpose and junk garden over at my blog, Organized Clutter.  

I am happy to be here today at the Inspiration Cafe, to share a Junkin' Jewels Valentine's Day project, that I created from a vintage Bake-King heart shaped cake pan.

I love to create seasonal decor from thrift shop items.  Kitchen ware is always plentiful at the thrift shops, so many of my projects use items like these:  cookie cutters, jello molds, and cake pans.

Last week I re-purposed the Jello mold, the cookie cutter and the necklace heart HERE.

Last year I made an ice cube tray shadow box HERE.

Today, I am going to make a button heart mosaic in the Bake-King cake pan.


Valentine's Day Cake Pan Button Mosaic www.organizedclutterqueen.blogspot.com
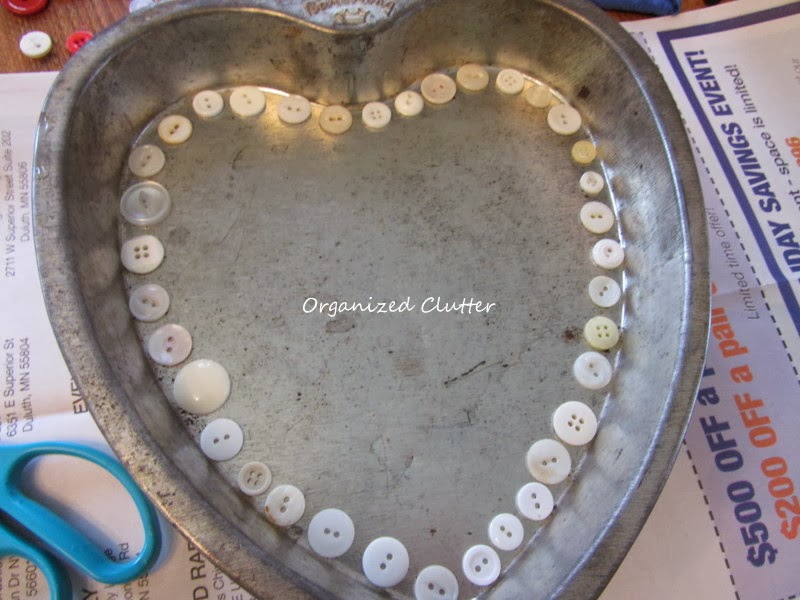
First I glued a row of white buttons around the edge of the heart pan with Elmers Probond Advanced Glue.

Valentine's Day Cake Pan Button Mosaic www.organizedclutterqueen.blogspot.com
Then I started filling in the heart with red buttons of various sizes.

Valentine's Day Cake Pan Button Mosaic www.organizedclutterqueen.blogspot.com
This is my button mosaic before grouting.

Valentine's Day Cake Pan Button Mosaic www.organizedclutterqueen.blogspot.com
I had a container of white non-sanded grout on hand that I mixed up without measuring.  I had read on the internet that the grout should be the consistency of peanut butter.

Valentine's Day Cake Pan Button Mosaic www.organizedclutterqueen.blogspot.com
 I put on a rubber glove and applied the grout with my gloved hand.

Valentine's Day Cake Pan Button Mosaic www.organizedclutterqueen.blogspot.com
I smoothed the grout, and wiped off some of the grout with a wet sponge.  Then I let the grout set up up a bit before I continued removing the grout on the buttons.  This was probably the most time consuming part.  I used a wet sponge, several wet Q-tips and a bobby pin to scrape and wipe out the grout.

Valentine's Day Cake Pan Button Mosaic www.organizedclutterqueen.blogspot.com
The finished mosaic looks like this.

Valentine's Day Cake Pan Button Mosaic www.organizedclutterqueen.blogspot.com
I am displaying the mosaic on a plate stand in my kitchen.

Valentine's Day Cake Pan Button Mosaic www.organizedclutterqueen.blogspot.com


I want to thank the gals from Inspiration Cafe for the opportunity to share a project with you!


follow me here:


Sunday, February 3, 2013

FRENCH TOILE FRAME -

Welcome to the Inspiration Cafe today!  Danni here from Silo Hill Farm sharing yet another Valentine project.  Really, I cannot help myself....I love Valentine's Day and my house is full of it!  Probably because it's about the only time pinks and reds sneak into my decor!  I have said before that my style is kind of all over the place, but I seem to find something I like in every style and see no reason to settle on just one...or two...or more.  Todays project is a frame with a French Toile theme.
 Now for me, a little bit of French Toile print goes a long way because it's so very busy, so I'm just using a little bit.
I don't buy very much pretty paper from the craft stores, in fact, I almost never do.  I have another awesome source for paper and I'm sharing my secret with you today.  Are you ready to hear it?.......
I pick up old wall paper sample books from the wall paper stores.  Really...they throw them away and most of them will be happy to give them to you.  I have 3 huge sample books and between them, I have an infinite supply of all kinds of paper, textured, solids, prints, paintable, etc.  It's an amazing source and I use them in most of my projects that call for pretty paper, like this one here today.  The design in the heart is a piece of French Toile wall paper sample.  The paper surrounding it is from a sample of coordinating wall paper.  Wall paper sample books usually have matching papers side-by-side.  
Here are the supplies I used to make this cute little frame.....
 The little MDF heart frame set me back a whole $1.39 at Hobby Lobby when they had 30% off of all Valentine's crafts and decor. I like it because it's a stand up frame.  It comes with a little peg that fits in the back that allows it to stand.
Using just a small amount, I painted the wooden edges that would be exposed. 
I cut a little template from the heart and selected a piece of that beautiful toile paper that I liked to cover it with.  I chose the little hot air balloon because I've never been in one, but I want to!  (Wouldn't that be the most romantic Valentine's Day....a picnic, a bottle of wine...the French countryside?)
I used Mod Podge like a glue to attach the paper to both the frame and the heart template.  (A bonus to using wall paper...it's a little thicker than regular paper and doesn't bubble up when using the Mod Podge!)  I put the heart piece on the back of the frame which has little clips just like a photo frame to hold it in.  Almost done!
My favorite part of any project is the embellishment and since this was a French themed frame, I opted for opulence.  I used some thick brocade ribbon, pearl bead trim, some tiny silk ribbon and a silk bow.  All attached with some Alene's Tacky Glue... my favorite go-to adhesive.  (hello Alene's I plug you enough...send me some!)  
I thought maybe I was done, but being a Valentine's project and all, I just couldn't resist throwing in a couple of hearts that I made using this teeny tiny heart punch.
 And then I stopped....because less is more, even with French opulence!   

 C'est très beau n'est-ce pas?  (Oh yes...crafting with French Toile wall paper makes you speak French!!)  Since I had everything to make this, the only cost was the frame at $1.39.  Yay!


Linking up:
 
Tuesday To Do Party
TheRusticPig A Diamond in the Stuff


Dragonfly Designs

Thursday, January 31, 2013

Love Letters by Posh Pink Giraffe

We would like to welcome Becky to the Cafe today!


Pin It
Love Letters-DIY from Posh Pink Giraffe

Can you believe January is over?  That means Valentine's Day is just around the corner.  Have you thought about what you're going to do for kids Valentine's this year?  Looking for something that has a little pizazz?

How about love letters.....

Love Letters-DIY from Posh Pink Giraffe

Can we say, LOVE IT (in a sing song voice, of course)?  You could fill these little envelopes with just about anything.  The possibilities are endless.  Here are just a few ideas....

Make it a Pencil Pouch:
Add pencils, tag it "You're all write, Valentine." 
Make it a Sticker Book:
Add stickers & paper, tag it "I'm stuck on you"
Make it a Candy Pocket:
Add sweet treats, tag it "You're so sweet"

I'm sure just about anybody would love to get one of these for Valentine's Day.  So what do you say, are you in on this little project with me?


Love Letters-DIY from Posh Pink Giraffe

Begin by gathering the following supplies:
Two pieces of felt (8.5"x11") 
an envelope to use as a template
template for the x and o if you want
 (My font is "arial black" set at size 150.)

Love Letters-DIY from Posh Pink Giraffe

Start by using the templates to cut out the x's and o's.  You could do as many or as little as you want.  Fold your template at the line of symmetry.  Fold the felt also or you'll only have half the letter.  I found it was easier to work with the felt when I trimmed it from smaller pieces rather that the whole sheet.

Love Letters-DIY from Posh Pink Giraffe

Next step is to sew on the letters.  I did several stitches across here, but I like the pink one better where there are only three straight stitches across it.  Here's a tip:  I used spray adhesive on the back of the letters when I made the second one (the pink one) and found it was easier for the needle of my machine to go over the letters without trying to push them away.

Love Letters-DIY from Posh Pink Giraffe

Now you're ready to stitch the sides up.  Start at one of the smaller sides and take it around to the top of the other small side, making sure to back stitch at the beginning and end.  I decided to run a stitch along the top as well to help make it lay down better, but it is totally optional.  Last step is make a small slit in the back of the flap and sew in a button.

Love Letters-DIY from Posh Pink Giraffe

I know everyone doesn't have oodles and oodles of time to make a bunch of these and that is perfectly alright.  

Love Letters-DIY from Posh Pink Giraffe

Consider making just one.  You could write a love letter to your child using words of encouragement.   New Valentine's Day tradition, anyone?

Thanks for stopping by today.  
Before you go, will you please be a sweetheart and leave a comment?  Everyone could use some words of encouragement, right?

Becky

If you like these little Love Letters, make sure you check out my latest post, a teachers Blooming Valentine Gift.