Showing posts with label Junkin Jewels. Show all posts

Tuesday, January 14, 2014

Vintage Valentine Mosaic - Junkin' Jewels Series

With Valentines Day just a month away, we are so pleased to have Carlene from Organized Clutter create a seriously awesome Valentine project and give us an easy to follow tutorial.  

Hi!  I'm Carlene, and I collect, up-cycle, re-purpose and junk garden over at my blog, Organized Clutter.  

I am happy to be here today at the Inspiration Cafe, to share a Junkin' Jewels Valentine's Day project, that I created from a vintage Bake-King heart shaped cake pan.

I love to create seasonal decor from thrift shop items.  Kitchen ware is always plentiful at the thrift shops, so many of my projects use items like these:  cookie cutters, jello molds, and cake pans.

Last week I re-purposed the Jello mold, the cookie cutter and the necklace heart HERE.

Last year I made an ice cube tray shadow box HERE.

Today, I am going to make a button heart mosaic in the Bake-King cake pan.


Valentine's Day Cake Pan Button Mosaic www.organizedclutterqueen.blogspot.com
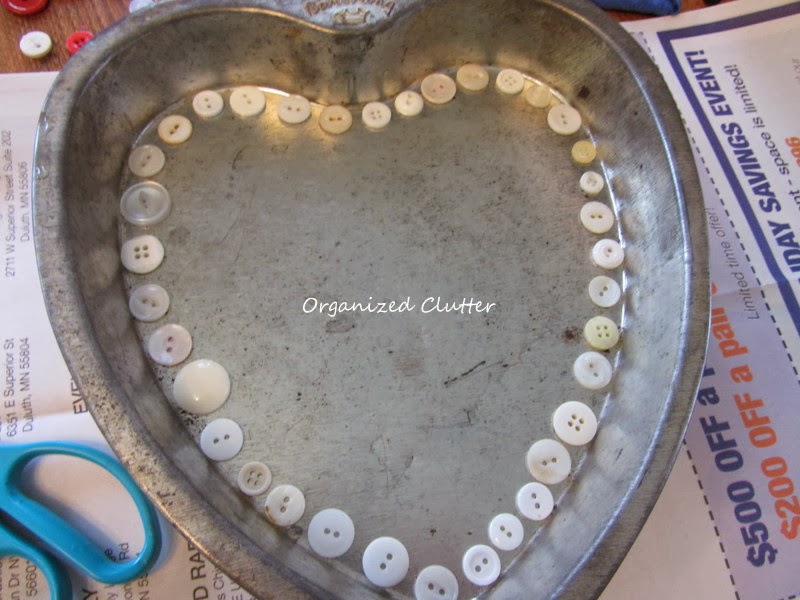
First I glued a row of white buttons around the edge of the heart pan with Elmers Probond Advanced Glue.

Valentine's Day Cake Pan Button Mosaic www.organizedclutterqueen.blogspot.com
Then I started filling in the heart with red buttons of various sizes.

Valentine's Day Cake Pan Button Mosaic www.organizedclutterqueen.blogspot.com
This is my button mosaic before grouting.

Valentine's Day Cake Pan Button Mosaic www.organizedclutterqueen.blogspot.com
I had a container of white non-sanded grout on hand that I mixed up without measuring.  I had read on the internet that the grout should be the consistency of peanut butter.

Valentine's Day Cake Pan Button Mosaic www.organizedclutterqueen.blogspot.com
 I put on a rubber glove and applied the grout with my gloved hand.

Valentine's Day Cake Pan Button Mosaic www.organizedclutterqueen.blogspot.com
I smoothed the grout, and wiped off some of the grout with a wet sponge.  Then I let the grout set up up a bit before I continued removing the grout on the buttons.  This was probably the most time consuming part.  I used a wet sponge, several wet Q-tips and a bobby pin to scrape and wipe out the grout.

Valentine's Day Cake Pan Button Mosaic www.organizedclutterqueen.blogspot.com
The finished mosaic looks like this.

Valentine's Day Cake Pan Button Mosaic www.organizedclutterqueen.blogspot.com
I am displaying the mosaic on a plate stand in my kitchen.

Valentine's Day Cake Pan Button Mosaic www.organizedclutterqueen.blogspot.com


I want to thank the gals from Inspiration Cafe for the opportunity to share a project with you!


follow me here:


Tuesday, December 10, 2013

Junkin Jewels - Snow Globes!

What a thrill it is to be here at the Inspiration Cafe!!  This is my first time being a guest blogger. So I hope I don't disappoint!

First of all let me introduce myself;  My name is Denise and I am a part of the "Junkin Jewels" series, here on the second Tuesday of the month....(Just love that name).  

Anyway, I blog over at Spittin Toad, so hop on over and see what my blog is all about (because even I haven't figured that out)  :) 
With that being said I had a tough time deciding what to share with you all....Snow Globes, Junky lamps or the TV we turned into a Fish Tank...


In the end the Snow Globes won out...After all "Tis the Season"!
Not to mention we had such a great time making them.  :)
I'm hoping this will inspire some of you to have your own creative little party!!
So lets get started;


The first thing I did was gather materials....
It was kind of like Christmas threw-up on my table...But who knew what this creative group of friends would need.....
Jars and snow and trees and....


Glitter and little ornaments both from the Dollar Store and garage sales....
Some of the trees I bleached some I did not...


It was so fun to see the different designs everyone came up with!!


Jessie put glitter on a reindeer (that was once a cupcake topper) by first coating it with watered down glue and then covering it in glitter...


She then glued it onto a delightful little dish from the Good Will...
added the tree and some snow and then placed a plain glass jar on top....
Added a ribbon, a pink poinsettia and she was done...Easy Peasy!!
Don't cha just love the combination of pink and green??


Gillian placed a Snowman in a tall canister adding some sheet music for the back ground....
Although the photo's don't show it well there is also a sparkly snowflake behind the little man...


Here's some of the girls showing off  their globes...

Isn't it amazing how uniquely different they all are?
Kory's is so sweet and tiny..


Gillian has her jar standing upright and Savannah painted a window on her's and had a little fire place, presents and a tree in it.  (I'm so sorry I didn't get a better picture of that one)!!   


I love the little red pom-poms going around the one above...
Autumn placed her jar on a vintage pedestal dish after painting Happy Holidays on it...
And...


I set mine on it's side...


So...What do ya think...Did you get some ideas??


I hope so!!


I also made a Snow Globe Cake out of a fish bowl...but that's a story for another time!!  :)

Thanks for having me!

Denise

Tuesday, November 12, 2013

Junkin Jewels - Tuula from The Thrifty Rebel

Tea Cups and Classic Rock - A Match Made in Wonderland


I'm so thrilled to be here at the Inspiration Cafe as part of the Junkin' Jewels series. I'm Tuula, and I blog over at The Thrifty Rebel.

When it comes to projects there's almost nothing I love better than repurporsing something... giving it a new life as something completely different.

Tea anyone?


When I saw this box of 34 vintage teacups and saucers at my local thrift store... how could I possibly resist? Like any self respecting junker I had faith that I would someday think of something to do with them.


how-to-make-teacup-lampshade


Well... time passes fast, and several months later that box of teacups was still sitting in my greenhouse/studio... mocking me... daring me to turn them into something. Anything!!!

Finally... last week when I was spending some time in there checking out my stash it came to me... and I got so excited that I had to start right away.

They have England engraved on their bottoms, and at first glance these teacups look rather unremarkable. (I was tempted to make a wreath out of them). But as we all know, first impressions can be deceiving... because...


how-to-make-teacup-lampshade


TA DA!!!!


how-to-make-teacup-lampshade


Sometime over the winter I'll have to figure out what to do with the 34 saucers.


how-to-make-teacup-lampshade


But for now ... it's all about the teacups. Aren't the colours fabulous? And so unexpected!


how-to-make-teacup-lampshade


Also in my greenhouse I had this set of thrifted ivory coloured planters. They look delicate, but they're made out of heavy duty metal and are very strong. They passed Miss Pixie's inspection.


how-to-make-teacup-lampshade


Here's what the larger one looked like this past summer.


how-to-make-teacup-lampshade


I tried the larger one on the lamp for size and it fit beautifully. It makes a perfect lampshade.


how-to-make-teacup-lampshade


I cut myself twenty pieces of jute twine about 20" long...


how-to-make-teacup-lampshade


borrowed the guest room lamp base because I needed something to hang the lampshade on while I worked...

turned up the volume on some classic Lynyrd Skynyrd, courtesy of You Tube, and started tying up the teacups... one by one.

Each one double knotted... finishing with a little jute bow, and changing sides as I went along to keep it all from tumbling down.


how-to-make-teacup-lampshade


And I tied while I listened to 'Simple Man'.


how-to-make-teacup-lampshade


And I tied to 'Sweet Home Alabama'.


how-to-make-teacup-lampshade


Until I finished.. half way through 'Free Bird'. One of my faves of all time.

And then I had to sit through the rest of the 13 minute musical phenomenon... completely mesmerized and fabulously lost in the past, and feeling just like a free, free bird. 


how-to-make-teacup-lampshade


Writing this now just made me have to go back and watch it again. Classic rock and junk makeovers go together like fine wine and cheese. Yummm!

Anyhoo... I digress.

The next day I hunted through my stash for a roll of thrifted lace, and wove it through the heavy wire slats. I found myself some classic CCR to weave to. Over and under, over and under.


how-to-make-teacup-lampshade


And I wove to 'Have Your Ever Seen the Rain'.


how-to-make-teacup-lampshade


And I wove to 'I Heard it Through the Grapevine'.


how-to-make-teacup-lampshade


Until I was done during 'Bad Moon Rising'.

I alternated how I did each section because I thought 8 bows would be a little too much. The lace is just to lessen the glare of the light bulb a little.

It was still missing something though. So once again I dove into my stashes, and I came up with this silver toned tea pot.


how-to-make-teacup-lampshade


I drilled a hole through the bottom, starting with a small metal bit and working my way up to slightly larger bits until my hole was just the right size.


how-to-make-teacup-lampshade


I spray painted it gold, and put it on its rightful place on the top of the lampshade. The lamp finial is screwed on inside the teapot.


how-to-make-teacup-lampshade


Here are some pics of the brass lamp, with the lampshade it came with that I didn't like, from when I thrifted it last summer.


how-to-make-teacup-lampshade

how-to-make-teacup-lampshade

how-to-make-teacup-lampshade

how-to-make-teacup-lampshade

how-to-make-teacup-lampshade


I wasn't even sure I was going to keep it, but here it is now with its 'Wonderland' lampshade... complete with teacup fringe. 


how-to-make-teacup-lampshade


And it's most definitely a keeper. 


how-to-make-teacup-lampshade


It graces a corner in my master bedroom.


how-to-make-teacup-lampshade

This lamp may not be everyone's cup of tea, but it's so right for this classic rock chick with a junker's heart and a soul full of whimsy.

'And this bird you cannot change'.

I have to say that there are moments in this life that make me wonder where my inner child has gone, and projects like this remind me that I haven't lost her... that she's still here. I hope I never see the world through adult eyes only, because I think I would miss sooo much.

Thanks so much for letting me, and my inner child, visit with you today. We still have 14 teacups and 34 saucers to play with! Yay!!!

Spread some whimsy somewhere today... and smile! :)