Showing posts with label DIY. Show all posts

Wednesday, August 21, 2013

Hanging Bookshelves - A Few Miner Adjustments

How to Make Hanging Book Shelves

(Made by my dad)


My dad is a master wood worker. It's true.  He would probably say otherwise, but he's just modest.
He converted his garage into a wood shop years ago 
and when he isn't at the golf course you can usually find him in there.
He has made breathtaking pieces of furniture and we are lucky enough to own some ourselves.
Kinda feels like we won the lottery... yeah, free furniture!
 

Anyway, a few weeks ago dad was cutting some wood on the table saw.
After 22 years of doing this, it was just another ordinary day of woodworking.
But that day ended differently. very. differently.
Although the blade of the saw is only just visible above the table, for some reason, 
as he pushed the wood through his thumb got in the way.
What?!? His thumb?!? NO!!!
 

He cut his thumb {felt the blade moving back and forth too...blech}, but don't worry. 
It is functioning and still attached to his hand.
This is a blessed moment of luck, I believe. A warning to us all...power tools do not discriminate.
So what does this have to do with these book shelves, you might be asking?
Nothing. Nothing at all. But let's face it...having hanging book shelves are way better than a hanging thumb.
 

Now hold onto your fingers!
Here's how to make the book shelves...
 

Thanks for making these, Dad!
We give this project....two thumbs up!

Thursday, June 13, 2013

DIY Inspirational Sign - Kreative Creationz

Today Kendra from Kreative Creationz is here to share a gorgeous DIY sign...


Everybody who knows me knows that I love my wall of quotes. There is just something about waking up in the morning and walking down stairs and the first thing I see is my wall of quotes. There are times when I need a little inspiration to get my day started or even times when I just need to smile. Even though I’ve had most of my inspirational signs for a couple of years, I still catch myself stopping to read every single one. Yeah, I know it sounds crazy but it makes me happy. What doesn’t make me happy is the price some of my quotes cost. Luckily, I bought most of them on sale. I still don’t want to pay for something I know for sure I can do myself. That’s where this little crafty project came in. The wooden cutout was only 97¢, the scrapbook paper was only 17¢, and the stencil was $3. Everything else I had on hand, so this craft is definitely a money saver! It’s my first go at stenciling, so please don’t be too harsh if you see some mistakes. Practice makes perfect, right? I have a few more that I will practice on this week and I will share once they are complete. I hope you find this craft inspirational, but before we get started I want to share with you some other quotes I have around my house. Enjoy!
   
What You Need:
1 Wooden Shape Cutout 
1 Sheet Decorative Scrapbook Paper 
Scissors 
Acrylic Paint 
Sponge 
Brush 
Lettering Stencil 
Mod Podge 
Spray Sealer 
Ruler 
Pencil 
Wall Mount 
Glue Gun  

Directions:
Trace the outline of the wooden shape onto the back of the scrapbook paper then cut out the shape. 
 

Apply two coats of paint to the edges and part of the front of the wooden shape with a color that coordinates with the scrapbook paper. Let completely dry.
 

Using the same color of paint and the sponge brush, stencil the letters onto the front of the scrapbook paper cutout. Let completely dry. 


Apply one coat of Mod Podge to the front of the wooden cutout and then place the scrapbook cutout onto the front of the wooden cutout. Turn cutout front side down, so that the scrapbook paper can dry flat. 
 

Once dry, in a well-ventilated area, apply two coats of spray sealer and let completely dry. 
 

Using ruler and pencil, draw a horizontal line on the top back of the cutout where you would like the wall mount positioned. 
 

Apply hot glue to holes on wall mount where screws would be (this wood was too thin to use the screws) and glue mount along horizontal line. 
 

Let glue dry and hang sign using a nail.


Wednesday, May 15, 2013

Up-cycled Picket Fence Sign - A Few Miner Adjustments

Daydream Believer

Project: Up-cycled Picket Fence Sign

Ever since I was a kid I would wake up on Saturdays and lay in bed staring into space for what seemed like hours.  
It would be 10am before I got up for the day.
What did I do for all that time?
You know...daydream, replay conversations, plan my To Do list.

Then when I had babies there wasn't any time for daydreaming under snugly blankets.
But time passes and now those babies are 7 and 5. 
They get up, come give me a quick kiss and then they are off to play and run and be boys.
So, lucky me...I have some of my daydreaming time back.

How to Make an Up-cycled Picket Fence Sign:

{1} Find some old weathered picket fence pieces.

{2} Have the hubs cut it to size. 
That is if you aren't terrified of the chop saw like me. Then by all means do it yourself.

{3} Cut the words out of sticky vinyl on your cricut. {4} Put eye screws in  the top. {5} Add wire. 

Hanging Tip:

Hold a sewing pin to the wall to see where you want to hang the sign. When you figure out the placement push it into the wall a little. The pin will remind you where the nail goes and the little hole will get the nail started. 

The end result?  Well, let's just say the hubs keeps talking about it every time he sees it.  I think he is in love!
Honestly, this Miner adjustment makes me swoon too!

These days I could daydream until 10 a.m., but it feels like a waste of the day. Maybe I am growing up.
8 a.m. is the limit and when I walk into the bathroom there is a nice little reminder of why I should be up.
Rise and Shine
….be awesome. ...have a great day.
...give hugs and kisses.
...get things accomplished.
There will always be time for daydreaming next weekend!
{Trina}

Wednesday, April 10, 2013

DIY Photo Coasters - My Favorite Finds

Hi Everyone, we are so excited to have Carrie from "My Favorite Finds" here at the Cafe today....


We are blessed to still have grandparents living.  Our children are growing up with great-grandparents, and we are so thankful for that!


 At Christmas, we love to still give gifts to our grandparents...but what do you give someone who already has and is content with everything?

I whipped up these cute photo coasters, and I was so pleased with how they turned out, that I want to make some for our new living/game room in the basement.

Supplies:

*4 square tiles, 4"x4" (I found these at Home Depot in the shower/tile section.  They were only about 19 cents a piece)

*Mod podge

*Printed photos, trimmed to 4"x4"

*Sponge brush

*Oil paint brush

*Clear polyurethane

*3/4" felt pads

*Hot glue/glue gun


Directions:

1.  Print your photos, on regular printer paper, in black and white.  I cut and pasted mine into a Word document and printed them.  I chose black and white because I like the dramatic look of that, and I didn't want to risk the color running or smearing when I applied the Mod Podge.

2.  Trim your photos so they are 4"x4".

3.  Using the sponge brush, apply a thin coat of Mod Podge on the surface of your tile and lay the photo on it.


4.  Smooth the air bubbles out and repeat this for the other three tiles.

5.  Apply a coat of Mod Podge over the face of your photo.  Allow it to dry, then repeat this two more times.

6.  Let your photos dry for a few hours.  Using the oil paintbrush, apply a few thick coats of quick drying polyurethane

to the surface of your tiles.  Let this dry for 24 hours.


7.  After the polyurethane has dried, turn your tiles over face down.  Apply a small amount of hot glue to each corner and adhere the felt pads.

I think these will make cute gifts for Grandparents Day, birthdays, and Mothers/Father's Day.  
I am sure that before too long, all the grandparents and Godparents will be the recipient of a set of coasters.


Wednesday, March 13, 2013

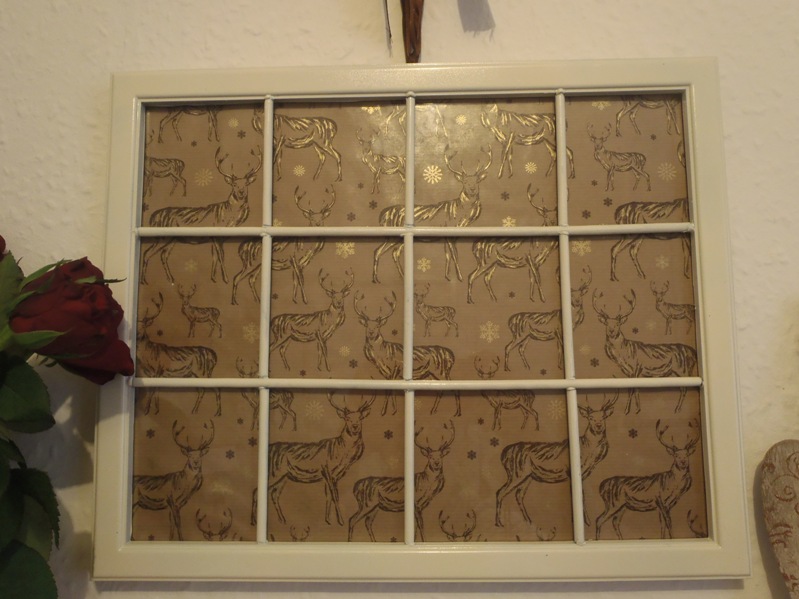
Window Effect Picture Frame - Twinkle's Tutorials and Craft Time

Good Morning, I'm Estelle aka Twinkle Star and I blog over at Twinkle's Tutorials and Craft Time. I am a busy stay at home wife and mum to four fab kids aged 6, 4, 2 and 3 months. Crafting keeps me sane in my crazy, busy life :)
Thanks to Mel and the girls at the Inspiration Cafe for having me over today. I will be showing you how to make a pretty Window Effect Picture Frame at a fraction of the cost...


You will need:
A Cheap Picture Frame
Wooden Sticks or Dowels
Sandpaper or Old Nail File
Glue and Glue Gun
Scissors or Craft Saw
Craft Spray Paint
Paper
I picked my frame up at the local pound shop (Dollar Store) and my wooden sticks were a 60 pence packet of garden sticks. The most expensive part was the can of spray paint - I bought a mini can, which was enough for this project. The glue and glue gun I already had.
Step 1:
Lay out your sticks in the design you would like your window 'panes' to be (I used 5 sticks)...
...cut off any excess...

Step 2:
Take the vertical sticks and cut each one into 3 pieces so that they fit snugly against the horizontal sticks and frame...

Step 3:
Remove the back and the glass from your frame then heat up your glue gun. Whilst you are waiting take each stick piece and sand off any rough bits (I used an old nail file as I didn't have any sandpaper to hand)...

Step 4:
Take the horizontal sticks and place a dab of glue on each end, adhere to your frame in your desired position. Do the same with each of the small pieces attaching them to the frame edge and the horizontal sticks. Make sure they run in straight lines down...

Step 5:
Once the glue has dried take your frame outside and place on some paper to protect your surface (I like to use greaseproof baking paper as it stops the item from sticking to it). Lightly spray your frame twice, letting it dry between coats...

...Leave until completely dry.

Step 6:
Replace the glass, then add your chosen scene or photo and attach the back...

...looks pretty if you attach wide satin ribbon through the hanger and tie in a bow then hang up.

VoilĂ  a budget friendly way to achieve a Window Effect Picture Frame! (Would also look pretty on a mirror!)
Hope you enjoyed that tutorial, there are plenty more over on my blog - love for you to pop over and say hi!
Thanks ladies for having me, it was fun!
Estelle xx