Showing posts with label Christmas. Show all posts

Tuesday, December 17, 2013

REINDEER GAMES - Bliss Ranch

Hello Inspiration Cafe readers.  I'm Bliss and I blog at BlissRanch.  I think when Danni asked me if I would like to do a guest post she was hoping I'd show you a furniture creation, maybe something like this Kodak Dresser.....


or maybe a piece of furniture that rocks.....


But it's December for goodness sakes, and Danni is such a deer.....

Bliss-Ranch.com Log Reindeer
So instead I'm going to tell you about the log reindeer we make for friends and family.

This is one project that I start for the holidays well before the snow flies.  My husbands Uncle Tony was our inspiration about 20 years ago.  He made fairly good size deer then strung lights on the antlers and one year he made some small ones for us to hang on the tree.

Uncle Tony's Mini Deer Ornament
That started my obsession with making them as gifts, plus we have plenty of the raw material laying around.

Future Reindeer
One Christmas Eve some "deer" friends of ours went to church and while they were gone we implemented operation "Not Tonight Deer".  The covert mission involved quietly placing "Oh Deer" and "Yes Deer" on their walk way to welcome them when they arrived home.  My husband Brawn and I thought we were pretty darn funny.


Over the years we have made lots of Rudolphs, and every one looks different.  The newest ones were made for each of the Grand kids with their names.

No I do not have a grandson named Rudolph.

Log Reindeer

 Our original deer had big wiggly eyes, but those didn't hold up so well in winter, and neither did their faux white fur tails.  And more than a few red noses have smashed to the ground.

Log Reindeer

Now we make most of their body parts out of wood.
Brawns in charge of the main body, tails and ears, I do eyes, antlers, legs and finishing touches.

Log Reindeer

They get a coat of glitter so they sparkle in the snow, some get jute with bells, and some get scarves.

Log Reindeer
 The scarf on this deer was an old knit hat with pom poms that I cut up.

Antlers are usually better looking, 
but there were mosquitoes out in antler making country when this one was made.


Log Reindeer
These ones are out to pasture.  Winter is hard on deer.  The one on the left is bark-less - Brawn made it that way.  These will get all cleaned up with new noses and scarves, fresh antlers, missing legs replaced, and soon they will line our walkway.

Log Reindeer
 The deer Uncle Tony made had noses that would light up.
Ours do not.


When this deer comes out of the shed it will go live at our oldest son's home, but first it will get some better antlers!

Log Reindeer Bliss-Ranch.com
Thank you for inviting me Danni, I'm so very happy to be here and offer up a taste of Bliss Ranch inspiration at the Inspiration Cafe!  Everyone is welcome to stop in at the ranch.


Tuesday, December 10, 2013

Junkin Jewels - Snow Globes!

What a thrill it is to be here at the Inspiration Cafe!!  This is my first time being a guest blogger. So I hope I don't disappoint!

First of all let me introduce myself;  My name is Denise and I am a part of the "Junkin Jewels" series, here on the second Tuesday of the month....(Just love that name).  

Anyway, I blog over at Spittin Toad, so hop on over and see what my blog is all about (because even I haven't figured that out)  :) 
With that being said I had a tough time deciding what to share with you all....Snow Globes, Junky lamps or the TV we turned into a Fish Tank...


In the end the Snow Globes won out...After all "Tis the Season"!
Not to mention we had such a great time making them.  :)
I'm hoping this will inspire some of you to have your own creative little party!!
So lets get started;


The first thing I did was gather materials....
It was kind of like Christmas threw-up on my table...But who knew what this creative group of friends would need.....
Jars and snow and trees and....


Glitter and little ornaments both from the Dollar Store and garage sales....
Some of the trees I bleached some I did not...


It was so fun to see the different designs everyone came up with!!


Jessie put glitter on a reindeer (that was once a cupcake topper) by first coating it with watered down glue and then covering it in glitter...


She then glued it onto a delightful little dish from the Good Will...
added the tree and some snow and then placed a plain glass jar on top....
Added a ribbon, a pink poinsettia and she was done...Easy Peasy!!
Don't cha just love the combination of pink and green??


Gillian placed a Snowman in a tall canister adding some sheet music for the back ground....
Although the photo's don't show it well there is also a sparkly snowflake behind the little man...


Here's some of the girls showing off  their globes...

Isn't it amazing how uniquely different they all are?
Kory's is so sweet and tiny..


Gillian has her jar standing upright and Savannah painted a window on her's and had a little fire place, presents and a tree in it.  (I'm so sorry I didn't get a better picture of that one)!!   


I love the little red pom-poms going around the one above...
Autumn placed her jar on a vintage pedestal dish after painting Happy Holidays on it...
And...


I set mine on it's side...


So...What do ya think...Did you get some ideas??


I hope so!!


I also made a Snow Globe Cake out of a fish bowl...but that's a story for another time!!  :)

Thanks for having me!

Denise

Sunday, December 8, 2013

Homemade Christmas

I thrill at an after Christmas sale as much as the next person.  The opportunity to buy a holiday gem at half price and get to decorate with it the following year.  I do let my children choose an ornament each year, but that is probably the only thing we buy during the actual season at full price.

What I love even more than sweet savings, though, is to create my own Christmas crafts.

I have been known to get really crazy, and make wall hangings that take years to complete, but I really enjoy something simple that can be made from start to finish in an evening or less.

Here are my favorites.  Most use simple felt, thread, embroidery floss, ric rac and the occasional button embellishment.  Oh, and a pile of beads and wire, and some serious help from the bead lady.

Santa has special stockings that he puts goodies in for my crew.  They are ones that Mama made special, and sets aside Christmas Eve for him to fill.

Construction is simple enough.

Cut out two pieces of felt in the shape of a stocking.  This took me a few times to get the size just right, so they were big enough to fill with presents or coal.   Decorate the front of the stockings with whatever adorable pictures your imagination can come up with....or in the case of Daddy's stocking, and you are tired and just want to get it done...a Christmas tree and dots.  Embroider a name at the top then whip stitch the front and the back together, and, done!

Back in the days before I had any money to buy Christmas decor at half price, I made my own decorations. Again with felt.  The mittens are just two pieces of felt, blanket stitched together, with a piece of faux fur glued to the top.  The stocking ornaments have ric rac sewn decoratively down the front.  Easy and cute.

Then you graduate from felt and move on to beads.  These are our Christmas spiders.  There's a lovely story behind them: They say an impoverished family had nothing to decorate their tree with one Christmas, and so when they went to bed, a family of spiders spent the entire night, Christmas Eve, weaving and spinning their webs all over it to make it beautiful for them come Christmas morn. Santa came in and knew how hard the spiders had worked, but that the people might not see the beauty of a tree covered in spiders web, so he touched the web and it turned into tinsel.

Everyone, please have a Merry Christmas this year and if you don't celebrate Christmas, please have a wonderful holiday season.  And get out the glue gun and your pile of felt and see what you can come up with. You'll find you love what you've created so much more than anything you've ever bought.

Happy Crafting!

Heather

Sunday, November 24, 2013

'Tis the Season - Christmas Goodies.....

Hey Everyone,

I hope you're all getting ready for Christmas, we've started crafting already!!!

Today I wanted to show you a few ideas that double not only as Christmas goodies for your family but also as gifts for friends and neighbours...

All so simple and so fun... Just click on the image to take you to the tutorial.


My husband's Grandmother passed this biscuit recipe down to me when I got married. It has to be the easiest biscuit recipe ever but be warned, it makes heaps!!! And they are gobbled up really quick too! We like to give away batches as gifts and the kids love to decorate them..

http://www.northshoredays.com/2012/12/grandmas-german-biscuits.html


Last year, my kids and I made these hearts - so quick and child friendly! A lovely gift on anyone's tree.
http://www.northshoredays.com/2012/12/glitter-heart-decorations.html


We also whipped up these easy glitter balls. The kids personalised theirs while I made a few simple ones. Great to share with friends and family alike.
http://www.northshoredays.com/2012/12/glitter-ball-decorations.html

If you like to make jewelry then this Sweet Snowman Pendant is just the ticket for the holidays. You can also whip up a pair of earrings or even a few beaded ornaments....
 http://inspirationcafeic.blogspot.co.nz/2012/12/sweet-snowman-pendant-necklace.html

Thanks for stopping by, I hope you try a few of these ideas this year.

Please join us again next week for the next installment of our 'Tis The Season series...


Take care


Sunday, December 16, 2012

Four Easy Go-To Holiday Treats That Are Sure To Be Crowd Pleasers!


Seasons Greetings!

It's Mary, from 
Sweet Little Bluebird!


Today I am sharing FOUR recipes that are favorites 
of my family and friends! They are ridiculously 
easy to make with just a few ingredients...
and oh so good! 

First recipe, 

ROLO TURTLES


My friend made these for a holiday cookie swap a few years back, 
it was my first time ever having them.  They are so darn good!  
                                                                                                                               
ROLO TURTLE RECIPE:
Ingredients
Bag of Pretzels Squares or Rounds (Reg or Butter Flavor)
Bag of Rolos- approx 56 rolos  in  12 oz. bag
Bag of Pecan Halves

Directions
Preheat oven to 250*F
Line the pretzels on cookie sheet, place a Rolo on top of each pretzel.  Bake 4-5 mins, just long enough for the Rolo to get soft, DO NOT OVER BAKE.  Pull from oven, take a pecan half and lightly press down on top of rolo.  Cool.  Eat.  Yum.

*If you have a nut allergy in the house, instead of using a pecan, just place another pretzel on top.  They also can be made in the microwave!


                 ......................................................................................

Next recipe,
shared by a sweet friend...

PRINCESS COOKIES, 
my little one's favorite!

You won't believe how good these are!
Trust me, they will fly off the plate!


PRINCESS COOKIES RECIPE 

Printable Recipe 


Ingredients

1 box of Wheat Thins

Creamy peanut butter

White or milk chocolate

Sprinkles

Direction
Make peanut butter sandwiches with the Wheat Thins, *see photo above.
Dip in white or milk chocolate, place on wax paper,
add some sprinkles...you're done.  So darn yummy!

...................................................................................

Next Recipe,

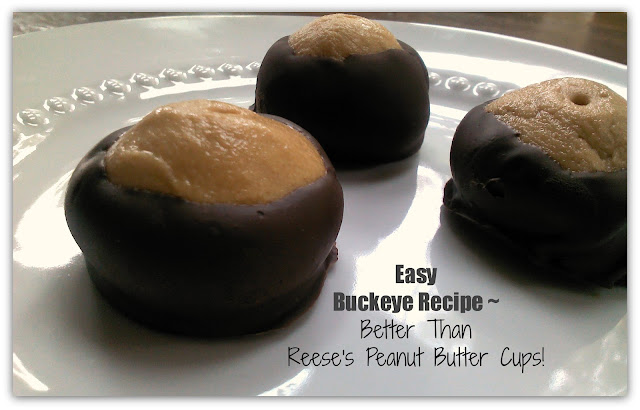
BUCKEYES!

If you love Reese's Peanut Butter Cups, you will love this simple recipe!
This recipe has been around for decades...since I was a kid.  
Only 4 ingredients!

BUCKEYE RECIPE:

Ingredients
1 Cup Creamy Peanut Butter
2 Cups Powdered Sugar
1/2 Cup Butter (salted or unsalted) Softened
2 Cups of Semi-Sweet Chocolate Chips

Directions
In a large bowl,  mix peanut butter, butter and powdered sugar. Cream together 
until blended well.  Next, roll peanut butter mixture into 1 inch balls and place 
on a cookie sheet covered with wax paper.  Place balls in freezer for 30 to 40 
minutes until firm.  When the balls are firm, melt chocolate chips in a microwave 
safe bowl, approximately 1 1/2 to 2 minutes, checking often and stirring.  Insert a toothpick in center of a ball and dip it 3/4 in the melted chocolate.  Place back on wax paper to set.  They set faster in the fridge or freezer.  Recipe makes approximately 25-30 buckeyes!  I store my buckeyes in the fridge.  Enjoy!

.........................................................................................

And finally,

EASY PEANUT BUTTER CUP COOKIES

The easiest Peanut Butter Cookies you will ever bake!


EASY PEANUT BUTTER CUP COOKIES RECIPE:

Ingredients
1 cup creamy peanut butter
1 cup sugar
1 egg

Optional 
Mini Reese's Peanut Butter Cups
1/2 cup mini semi-sweet chocolate chips

Directions
Preheat oven to 350 degrees F.  
Cream peanut butter, sugar and egg together.  If you want mini chocolate chips, add them after you cream the first three ingredients.  Take a spoonful of dough, form into a ball, place a peanut butter cup in the middle, cover PB cup completely.  Place on cookie sheet.  Bake for 8-10 mins on middle rack of oven.  *Do not over bake.  Remove, allow to cool.  Enjoy!

I've seen the recipe several times over the years.  One was just for peanut butter cookies, another was for Reese's Peanut Butter Cup cookies.  If you want just a simple peanut butter cookie, skip the peanut butter cups and chocolate chips.  If you prefer chocolate chip peanut butter cookies, skip the Reese's Peanut Butter Cups.   Have fun with this easy recipe! Our house likes the peanut butter cups and mini chocolate chips!  Yum!

.............................................................................


Thank you so much for stopping by Inspiration Cafe!  
I won't be near a computer most of the week, 
but hope to be back by the weekend.  If you have any 
questions about the recipes, leave them in the comment 
section and I will reply as soon as I can.   

Happy Holidays!

Mary


Sunday, December 9, 2012

Sweet Snowman Pendant Necklace

 
Hey Everyone,

Here in New Zealand we have a Summer Christmas, so..... no snow!
But our warm Kiwi Christmas' are pretty awesome too...

One year, Sean and I were in England and we got to experience a white Christmas...and I even got to build my very own snowman.

So, today I have a cute, easy and fun holiday inspired pendant tutorial for you. 

  What you need:

2 large beads, seed beads, 1 headpin, a length of jewelry wire, a chain and pliers.

Following the steps laid out in the pictures, so easy!

Thread the 2 large beads onto the headpin,
Bend back to 90 degrees, loop back around with the pliers
and wrap the end of the headpin around and secure it with a gentle squeeze with the pliers.
Thread the seed beads onto the jewelry wire and secure the ends, I just looped the wire back into the last bead on each end.
Mould the scarf around your finger then wrap it around the snowman's neck and press into place.

Add a chain...
 
And there you have a really cute little snowman necklace...

These would make awesome hand made gifts or even Christmas ornaments for a little tree.


I really hope you are inspired to give this tutorial a go.... 

Are you giving handmade gifts this year?

If so, we would love to hear your ideas and what you're making.
 

Don't forget to follow us on Facebook,


Take care and have a great week

 xxx
 

Photobucket
and: