Posts
Posts


 Springfield Time
 Melbourne Time
 Auckland Time
I was so excited to be asked to guest post here on the Inspiration Cafe.
Thanks Mel from Mellywood's Mansion for the invite!
Hi There! I'm the FERAL TURTLE.
I have been blogging for just over a year now! I am a Canadian girl, a rural dweller, who loves to garden, reno my hundred and eight year old home, and craft.
This is how I make soap!
I must stress that soap making can cause serious burns and that proper equipment is a must. My soap kit contains heavy rubber gloves, safety glasses, a thick apron and long sleeves. For equipment, I use a large stainless steel pot, a glass quart wide mouth canning jar, a wooden spoon, small glass dish, a scale, a silicon spatula, a hand held stick blender, a large stainless steel mixing bowl, and a homemade soap mold.


When the mold is full, cover exposed soap with plastic. I use saran wrap. Wrap in a blanket and let sit for at least 3 days to harden.



I have been blogging for just over a year now! I am a Canadian girl, a rural dweller, who loves to garden, reno my hundred and eight year old home, and craft.
This is how I make soap!
People stink! A quick remedy for
this, a shower with soap! Voila...no more stinky people! If you happen to have stinky people with sensitive skin, you could make them a bar of Castile soap, which is a pure olive oil soap, free from sodium lauryl
sulphate; a.k.a. SLS
This soap is a gentle and mild cleanser. People who have eczema as
well as sensitivity to (SLS), prefer
this soap.
SOAP MAKING CAN BE A DANGEROUS HOBBY. PLEASE DO YOUR RESEARCH CAREFULLY BEFORE ATTEMPTING.
I must stress that soap making can cause serious burns and that proper equipment is a must. My soap kit contains heavy rubber gloves, safety glasses, a thick apron and long sleeves. For equipment, I use a large stainless steel pot, a glass quart wide mouth canning jar, a wooden spoon, small glass dish, a scale, a silicon spatula, a hand held stick blender, a large stainless steel mixing bowl, and a homemade soap mold.
I gather all my ingredients to start.

PUT ON YOUR SAFETY GLASSES, RUBBER GLOVES, LONG SLEEVES, AND APRON!!!!
DO NOT START THESE NEXT STEPS WITHOUT SAFETY GEAR.
Weigh 11 ounces of cold water into a quart sized wide mouth mason jar and place in a stainless steel bowl. I put the bowl and jar in the kitchen sink. If any spills, it will clean your drains.
SEPARATELY weigh out 4 ounces of sodium hydroxide into a small glass dish.
Pour the sodium hydroxide INTO the water, not the other way around. Fill stainless steel bowl halfway with cold water as pictured below. This will help cool the sodium hydroxide mix quickly. Stir this with a wooden skewer until dissolved. Make sure you are wearing your protective gear. This stuff is dangerous. Don't breathe in the fumes cuz it will make you cough. Let the solution cool to 110 degrees.


Meanwhile weigh and pour 32 ounces of olive oil into a large stainless steel pot. (THIS IS ONE TIME YOU CAN CHEAP OUT . JUST USE PLAIN OLIVE OIL. YOU DON'T NEED TO BUY THE EXPENSIVE EXTRA VIRGIN OLIVE OIL. VIRGIN OIL DOESN'T MAKE GOOD SOAP.) Heat to 110 degrees.

When both the sodium hydroxide solution and oil are at 110 degrees, pour the sodium hydroxide solution into the oil. Stir this mixture for about 15 minutes with the wooden spoon.

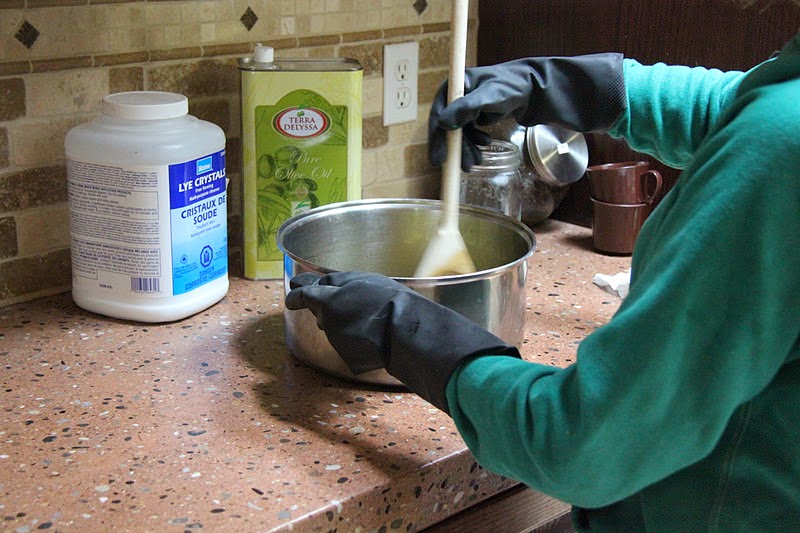
Next step is to get out the stick mixer or you could be stirring for days. Mix the soap until it reaches trace. This means the mixture will change colors (a creamy off white) and will thicken. It should be the consistency of vanilla pudding. You can add your essential oil now (up to 2 ounces) and mix thoroughly with the stick mixer. If I am making lavender soap, this is when I would add 1/4 cup of lavender seeds, stirring them in by hand. You could add poppy seeds to lemon soap......etc. etc.


Pour the mixture into the mold, scraping the pot out with a silicone spatula. This mold was designed to hold this size batch of soap. A mold can be made from a heavy cardboard box lined with plastic. I would say a box about 10 inches long x 4 inches deep x 3 inches wide. You can build this from wood too. This would be the better option if you are planning on making soap more than once. Make sure you line your mold with plastic though, or your soap will get stuck when cured and could also leak out the sides when you pour it into the mold.
Your mold must be leak proof!


When the mold is full, cover exposed soap with plastic. I use saran wrap. Wrap in a blanket and let sit for at least 3 days to harden.
When the soap is hard, remove from mold and cut into bars
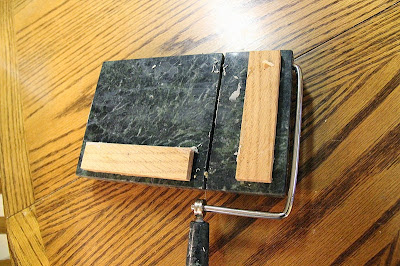
I use a cheese cutter that I modified with some sticks and epoxy so I could cut the soap in even bars. (I see cheese cutters at the second hand stores all the time.)
You can use a large sharp knife to cut your soap too. Whatever you have!
You can use a large sharp knife to cut your soap too. Whatever you have!


The soap needs to cure for minimum 4 weeks. I leave mine longer, usually 6 to 8 weeks as Castile soap needs a longer curing time. I put it in a closet with wire racks so that air can circulate around the bars.

After it has cured, the soap is sealed in shrink wrap to keep the essential oils from evaporating. You can wrap it in fabric and tie with a bow, or in cardboard with a flower hot glued to the packaging, or just leave it in the air. You will still maintain scent in your bar, but sealing it, keeps the smell stronger.

I cheated! I am showing you a bar of lavender soap (see the lavender buds).
The blog batch is still curing.
HAPPY LATHERING!
HAPPY LATHERING!
CHEERS!
Thanks to the amazing Inspiration Cafe for featuring my blog.
Perhaps you would like to visit a few of my other posts:
The building of a bathroom

Building some wine storage

Thanks to the amazing Inspiration Cafe for featuring my blog.
Perhaps you would like to visit a few of my other posts:
The building of a bathroom

Building some wine storage




.JPG)
.jpg)