Wednesday, November 28, 2012

Stunning Christmas Tree by The Thrifty Rebel

Have you seen anything like this glittering, jewel topped Christmas tree before?  I sure haven't!  It is a sparkly show stopper, isn't it?  It would make a great centerpiece for a Christmas party or command attention on a Christmas mantel.  

shower-curtain-ring-Christmas-tree

Tuula put this together with "just a few" inexpensive items, some paint, glue and glitter.  Even the tree topper is a thrifty treasure!

shower-curtain-ring-Christmas-tree

Tuula's tree crafting supplies!

shower-curtain-ring-Christmas-tree

Visit The Thrifty Rebel to see exactly how Tuula took these everyday items and turned them into this beautiful Christmas Tree.  


Thanks for visiting Inspiration Cafe today!
Remember, we are looking for great projects and blogs to feature and guest post.  
Just click on Guest Post to find out more.

Sunday, November 25, 2012

Christmas Inspiration ~ Affordable Christmas Decorating


Ornaments
These paper tree ornaments can be found at Alderberry Hill.    Sarah shows you how easy it is to make these out of double-sided scrapbook paper and a few well placed embellishments.
(I've got plenty of both hanging around here already!)

These are perfect for adding some color and sparkle to the Christmas tree this year.

PAPER TREE ORNAMENTS 10 thumb Paper Tree Ornaments


Speaking of having supplies you need...who doesn't have some spare toilet paper rolls?

Natalie @ NorthShore Days created these sparkly flowers out of them!  And if it seems a little funny to decorate your Christmas tree with...mm hmm...flowers ~ Christmas is in the summertime in New Zealand.  Ever thought about having a BBQ for Christmas dinner???


 Aren't these Silhouette Christmas Tree Ornaments darling?   This project was so simple and turned out so beautiful.  I probably would have been sitting with my scissors cutting out silhouettes for hours!!!  It's a good thing Andrea shows us how to make these the easy way.  Go visit Andrea @ Willow Wisp Cottage to see how it's done.


Decor

Danni @ Silo Hill Farm has created this beautiful Framed Christmas Art.  This would look great in a Christmas vignette on a mantle, a shelf, or a counter top.  It's so nice to add little touches of Christmas all over the house! 


Danni's not the only one making Christmas Art!

Mary of Sweet Little Bluebird crafted up some elegant Christmas frames last season.  (And she doesn't think she's crafty!)  It's amazing how Pinterest can inspire us.


And while we're talking about frames for Christmas decorations, you should definitely check out this mini frame wreath from KariAnne of Thistlewood.  KariAnne always has such compelling stories she shares with her projects...it's such a treat to visit Thistlewood Farm and get inspired by her! 


I saw a ton of frames similar to these at the Dollar Tree recently too.  I wish I would have known then what pretty wreaths they would make!!!  I would have bought a whole bunch.  What a wonderful gift this would be for grandparents too.  Stunning.

What about offering your guests a treat when they visit? Like this hot chocolate station found at Pondered Primed Perfected last Christmas.   Using a tray made from a cabinet door, a few Christmas accessories, and all the makings for hot chocolate we had a warm way to welcome guests for the season.


I love this Candy Cane Hot Cocoa Bar from Jenn at Clean and Scentsible.  It has such a rustic, inviting charm about it, don't you think?  Jenn provides a link so you can print your own tags if you're interested in making something similar.
.


Have fun decorating and enjoy the festive season!

Thanks for visiting the Cafe.  We would love to hear how you make your Christmas season special.  Leave us a comment or send us a link to your Christmas projects.

Sherry ~ Contributor at Inspiration Cafe
Author at Pondered Primed Perfected


Wednesday, November 21, 2012

Thrift Store Decorating for Christmas with Fox Hollow Cottage

We are thrilled to introduce you to Shannon of Fox Hollow Cottage.  Shannon has taken a neglected 1920's cottage and turned it into a light-filled, warm, swoon-worthy cottage.  Her photos are definitely magazine worthy.

She's got an eye for detail, and a knack for taking thrift store finds and making them look like high-end decor.  And it's impossible not to like her personality, warmth and charm. 


There are so many projects you don't want to miss at Fox Hollow Cottage.
  
Like Shannon's Cottage Style Kitchen Makeover:
(Just wait until you see the rest of her kitchen...not to mention the BEFORE photo!)


Or this Harlequin Table Makeover:
(This is quite fresh, isn't it?)

Table refinished using La Craie Chalk Paint

And since Christmas is quickly approaching, we are loving the great ideas she shared in her 'Decorating with Thrift Store Finds {Christmas Edition}' post.
(Just in time for us to get some thrift store shopping done too!) 

Isn't this Christmas scene just gorgeous?


Wait, did we say 'Thrift Store Find Decorating'?

How on earth did she pull this off with Thrift Store finds???


Lucky for us, she shares some of her best tips and step-by-step explanations on how to create such stunning looks on her blog, Fox Hollow Cottage.  

Like this:


I don't know about you, but Shannon has really made me want to take a trip to some thrift stores this weekend.

To see how Shannon pulls off all of these dazzling Christmas looks
click on the image below:


You can also follow her on Facebook, Twitter, Google+, Pinterest, or visit her Shop.

Once you've created the perfect thrifty Christmas projects, you're going to want to link them up at the 
"Dollar Tree Christmas" Link Party too.

Co-hosted by Fox Hollow Cottage and DebbieDoo's:


Thanks for visiting today!
We hope you've found some Christmas Inspiration while here.  See you again soon~


     Image Map

Tuesday, November 20, 2012

NorthShore Days Blogiversary Giveaway...

Today is my blogiversary - wow I know right, a whole year has just flown by ....

For my blogiversary I would love to reach 200 Facebook likes by the end of my day here in New Zealand....I'm soooooo close!

So please pop on over and like my NorthShore Days page and be in to win this awesome Winter bracelet, it would make the perfect Christmas gift....and I had so much fun making it.


Hope you're all having a fab day 

Take care


Photobucket

Sunday, November 18, 2012

CHRISTMAS COMES TO THE INSPIRATION CAFE!

Hello everyone, Danni here from Silo Hill Farm and I am a crafter!


This first series we are talking about what inspires us to create.  This is an easy one for me and my answer is two-fold.  My original inspiration and the beginning of all of my crafting comes from my best friend Judy.

When I first moved to Montana some 17 years ago, I knew no one and had never crafted a single thing in my life.  I met Judy, and she was all about crafting.  If I was going to hang out with her, I was going to have to learn to craft I didn't believe I had a crafty bone in my body.  I couldn't have asked for a better craft mentor.  The winters are long and cold in Montana and crafting saw me through all of the 8 years I lived in the mountains.  Thank you to Judy for giving me some skills that would get me through a lot more than just some snow and cold!

The other half of my inspiration, comes from YOU!  All of you out there in the craft blog world!  After a 10 yr. hiatus from crafting when I moved back to Missouri, I finally unpacked all of my craft stuff and started a blog.  If you look back at my blog, in the beginning, it was not much about crafting....but then, I stumbled on to all of you and your amazing projects and my inspiration was rekindled and then caught like wildfire.  So thank YOU...all of you!

Having said all of that, I would l like to show you how to make a project that Judy and I did together when she was here last week for 11 glorious days of crafting!  Check it out....


 I love the rustic look of it and Judy keeps me from overdoing it sometimes with the "less is more" reminder!  

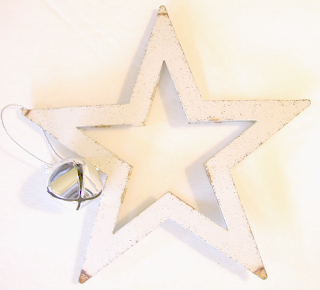
To start out with, you need a star made out of sticks of the same size and either wired together or nailed together.  (Mine is nailed and I would recommend pre-drilling first.)


 Then, attach some faux evergreen branches, snipped to size, (mine are leftover from another project) with some floral wire.  I liked putting them in just the center so the sticks would show, but you can do the whole thing if you like.


 Of course, embellishing a project is my favorite part and I had this metal star and silver jingle bell.


 You may remember seeing that star before.  It first made it's debut on my blog back in July.


Old Glory Picket Fence

 We attached the tin star and jingle bell to the back of the wreath using a thin piece of jewelry wire.


With that little bit of embellishment, our wreath was finished!


 As with most of the projects I make, this wreath can be disassembled after the holidays and all of the parts used for something else!  Stay tuned...you may see that stick wreath form again!

If you enjoyed this holiday project, it's just the first of many that Judy and I worked on during our 11 day Christmas Craftathon and if you are a follower of Silo Hill Farm, you'll be seeing the other 10 awesome Christmas projects starting right after Thanksgiving!

Thank you to my dear friend and craft mentor Judy, all the awesome girls from the Inspiration Cafe, who lend encouragement and support unendingly, and to all of YOU for the amazing amount of inspiration you bring to my craft projects!

Linking up to any or all of the fine parties listed HERE and HERE. As well as......
Funky Junk Interiors:   Saturday Nite Special


Visit thecsiproject.com

Friday, November 16, 2012

Serenity Now ~ with Grace Grits and Gardening

Inspiration Cafe would like to welcome back Talya, from Grace Grits and Gardening for:

Serenity Now


I turned fifty last July. That's fifty times around the sun... Let that sink in for a moment.

In one day the average adult heart beats over 120,000 times. In fifty years, it beats ALOT–more math than I care to do. Definitely not something to take for granted... 

I feel better at fifty than forty. I attribute this in part to yoga. The gifts of yoga extend well beyond flexibility, toning, balance and strength. Its benefits include enhanced focus and creativity, lowered blood pressure and less anxiety. Yoga enhances heart health.


My favorite pose in yoga class is final savasana—Corpse Pose. Lying flat, feet relaxed, breath long, posturing the mind and body to imitate a corpse. A non-yogi may be skeptical, but if you practice, you understand. 

There was a time not that very long ago, corpse pose was the most difficult for me. I found it unnerving to lie still and let go. I should be doing something. So I took the opportunity during final savasana to mentally review my to-do list—crunch numbers for a loan application, call a customer, run by the grocery store, schedule a hair appointment, blah blah blah... Serenity Now!!!

Within only a few weeks, final savasana became the most beneficial part of my yoga practice. Letting every muscle in the body melt into the floor, freeing the mind to witness thoughts instead of thinking thoughts. Not awake, not asleep. Still and quiet for fifteen minutes or so—just being.


With the firmness of the earth beneath me, I feel my body relax and flatten into my mat. A wood flute plays softly in the background. The clock ticks rhythmically. Inside, energy from the class fills the room. Outside, the autumn leaves stir and traffic whirs beyond —busy people, a busy world. For a few moments, I luxuriate within my tiny spot. My mind empties, clearing space to think and create. Serenity now...

Then, back to writing.
Namaste,

talya

My favorite yoga studios...

1949 Green Acres
Fayetteville, Arkansas 72703

6337 Prospect
Dallas, Texas 75214

Frank Costanza: Serenity Now! Serenity Now!
George Costanza: What is that?
Frank Costanza: The doctor gave me a relaxation cassette. When my blood pressure gets too high, the man on the tape tells me to say Serenity Now!
George Costanza: Are you supposed to yell it? 
Frank Costanza: The man on the tape wasn't specific.    (Seinfeld)

***A Big Thanks to Talya, from Grace Grits and Gardening, for sharing her experience with yoga and reminding us of some important things during this busy holiday season!*** 

Have a wonderful weekend everyone!

Hugs from the Ladies of Inspiration Cafe


Sunday, November 11, 2012

Pre Feast Crafts for Kids

Hi everybody, it's Heather from The Beating Hearth and it's my turn over here at Inspiration Cafe.

This round, all the members of Inspiration Cafe are talking about what inspires them.  This has been so much fun to read for me and hopefully for you as well.  My inspiration comes from a couple of places really. 

My family is my primary inspiration.  I love to create a happy, warm and loving home for every member of my family.  What does that mean?  I am making quilts to keep them toasty, crocheting life-like dolls for my husband to take to work....ummmm...and cooking tasty food for us to eat together.

My second inspiration is selfish.  I am motivated to keep myself sane.  I do this by crafting and sewing.  I have found the saying "If Mama ain't happy ain't nobody happy" to be very true.  So, I get to have fun playing with fabric, express my creativity, make pretty things and take some time for myself....which refreshes me and gives me the strength to continue on when things get sticky.

Today, I have two projects for kids to do during the Thanksgiving pre-feast wait.


The wait for Thanksgiving dinner can be so painful for kids.  They are starving because you only gave them a tiny lunch in preparation for the feast to come.  They're antsy because so much is going on...Grandma is running around making sure the gravy doesn't burn and that her rolls are rising like they should...and the kids don't have anything to do...except for watch the parade on TV...and if there isn't candy being thrown (I don't know about your kids), but mine are not interested in a parade.

So, here's a fun tradition you can start with your own family as we are starting with mine.  Making Christmas decorations before the feast begins.  The children in my family are young, so there is nothing too advanced here, but they're sparkly and kids love sparkly.  This is while things are still cooking and dinner is still a ways away.


Buy some felt.  Whatever color you like.  Fold a piece in half and cut out the first initial of each of the children who will be making an ornament.  You want to make the lines of the letters fairly thick so you can get a nice layer of sequins on.  I just free-hand cut my letters, but you could draw them on the felt first to make sure you like what you've got.  This is something you will probably want to do in advance unless your kids are capable of cutting these out on their own.  It only takes a minute.


You want to have two pieces exactly the same because you are going to glue the two pieces together to give your ornament some stability.


Use craft glue.


Have them put a dab of glue on the back of a sequin and put it on the felt letter and continue on until it is completely covered.


Using some glittery thread and large needle, make a loop so they can be hung from the tree.  Put somewhere they can dry.  Feast.  Take home special Christmas ornaments.

Now, once you've got dinner almost ready, and you want to round up the kids to get them close, here's the next project...


If this is your table setting, notice the canning jar in the corner.  You are going to make one of these for each of the kids in your family.  To make things really fancy, you can also make your own cloth napkins

You will need a pint size canning jar for each child.  You will need 16 crayons per each jar.  You will need construction paper as well.


Cut several pieces of construction paper in half length-wise.  I put 4 pieces of paper per jar.


Write a note for each of your children letting them know all the reasons you are thankful for them.  This is a nice thing to read during your Thanksgiving meal.


Put 16 crayons on the perimeter of each jar.  Roll up the 4 pieces of construction paper.  Take your list and roll it up and place it in the middle of the construction paper.


Tie a piece of burlap and a bit of gold ribbon around each jar...you know...to make it festive.


Put these next to the place serving of each child and a few minutes before the feast begins, have them draw pictures of what they are thankful for.  If they are old enough, they can write what they are thankful for as well.


My Oldest....


...is thankful for the turkey.


My Youngest said she is thankful for me.  Aaawww...so she drew a sunflower.

Thanks for reading!

Linked up Here:
Photobucket